Excel JavaScript API
This demo focuses on the Excel JavaScript API.
For reading and writing Excel spreadsheets, other demos cover a wide variety of use cases and deployments.
SheetJS is a JavaScript library for reading and writing data from spreadsheets.
Office 2016 introduced a JavaScript API for interacting with the application. It offers solutions for custom functions as well as task panes.
Excel currently does not provide support for working with Apple Numbers files and some legacy file formats. SheetJS fills the gap.
In the "Complete Demo", we'll create a new custom function
SHEETJS.EXTERN() which tries to fetch an external spreadsheet and insert the
data into the worksheet.
This demo was tested in the following deployments:
| OS and Version | Architecture | Excel | Date |
|---|---|---|---|
| macOS 15.3 | darwin-x64 | 16.95.4 | 2025-04-17 |
| macOS 14.5 | darwin-arm | 16.96.1 | 2025-04-24 |
| Windows 11 | win11-x64 | 365 (2506) | 2025-06-17 |
| Windows 11 | win11-arm | 365 (2503) | 2025-04-24 |
There was a binary data bug affecting fetch and Excel. It was resolved in
version 2303. It is strongly encouraged to upgrade to the latest version of
Excel 365 before running the demo.
The Office Add-in CLI collects telemetry by default. It can be disabled:
npx -y office-addin-usage-data off
Integration Details
The SheetJS NodeJS module can be imported from scripts in an Excel Custom Functions project.
The sheet_to_json helper function
can generate arrays of arrays of values based on the worksheet data. Excel
custom functions transparently treat arrays of arrays as Dynamic Arrays.
This example fetches a file using the fetch API, parses the binary data using
the SheetJS read1 method and returns data from the first worksheet.
const XLSX = require("xlsx");

/**
 * Download file and write data
 * @customfunction
 * @param {string} url URL to fetch and parse
 * @returns {any[][]} Worksheet data
 */
export async function extern(url) {
  try {
    /* Fetch Data */
    const res = await fetch(url);

    /* Get Data */
    const ab = await res.arrayBuffer();

    /* Parse Data */
    const wb = XLSX.read(ab);

    /* Translate Data */
    const ws = wb.Sheets[wb.SheetNames[0]]; // get first worksheet
    const aoa = XLSX.utils.sheet_to_json(ws, { header: 1 }); // array of arrays

    /* Return Data */
    return aoa;
  } catch(e) {
    /* Pass error message back */
    return [[e.message || e]];
  }
}
Complete Demo
- Clear the functions cache. For the tested version of Excel for Windows:
- Open File Explorer
- Select the address bar and enter
%LOCALAPPDATA%\Microsoft\Office\16.0\Wef - Delete the
CustomFunctionsfolder (if it exists) and empty Recycle Bin.
This will delete all custom functions associated with the user account!
To preserve the custom functions on the user account, rename the existing folder
to CustomFunctionsBackup before testing and rename back to CustomFunctions
after testing is finished.
-
Install NodeJS LTS.
-
Launch a new PowerShell (Windows) or Terminal (MacOS) window.
-
Disable telemetry:
npx -y office-addin-usage-data off
- Install dependencies:
npm i -g yo bower generator-office
In some systems, the command must be run with the root user:
sudo npm i -g yo bower generator-office
Creating a new Add-in
- Run the generator:
npx -y yo office
The generator will ask a few questions:
-
"Choose a project type": Select
Excel Custom Functions using a Shared Runtime -
"Choose a script type": Select
JavaScript -
"What do you want to name your add-in?": Type
SheetJSImportand press Enter
The generator will create the project and install dependencies.
- Start the development process:
cd SheetJSImport
npm run build
npm start
If prompted to Allow localhost loopback for Microsoft Edge WebView, type
N and press Enter.
If prompted to install "Developer CA for Microsoft Office Add-ins" certificate,
select "Yes". On macOS, the security popup will ask for a password.
If Windows Firewall prompts to allow Node.js on private networks, select "Yes" A new terminal window running NodeJS will be created. Keep the window open.
A new Excel window with the loaded add-in will launch.
- In
manifest.xml, search forFunctions.Namespace. There will be an XML element with namebt:String. Change theDefaultValueattribute toSHEETJS:
      <bt:ShortStrings>
        <bt:String id="Functions.Namespace" DefaultValue="SHEETJS"/>
        <bt:String id="GetStarted.Title" DefaultValue="Get started with your sample add-in!" />
-
Close the Excel window and the terminal window. Do not save the XLSX file.
-
In the terminal window, start the development process again:
npm run stop
npm start
Integrating the SheetJS Library
- Install the SheetJS library in the project:
npm i --save https://cdn.sheetjs.com/xlsx-0.20.3/xlsx-0.20.3.tgz
- Replace
src\functions\functions.jswith the following:
var XLSX = require("xlsx");

/**
 * Print SheetJS Library Version
 * @customfunction
 * @returns {string[][]} The SheetJS Library Version.
 */
export function version() {
  return [[XLSX.version]];
}
-
Close the terminal window and the Excel window. Do not save the Excel file.
-
In a new terminal window, start the development process again:
npm run stop
npm start
- In the new Excel window, enter the formula
=SHEETJS.VERSION()in cellE1. You should see something similar to the following screenshot:
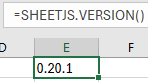
This indicates that the SheetJS library has been loaded.
In some MacOS tests, the add-in installed CONTOSO.VERSION. To force a refresh
of the manifest:
- Stop the development process:
npm run stop
-
Close the Excel app by right-clicking Excel in the Dock and selecting "Quit".
-
Restart the development process:
npm start
-
Activate the Task Pane for the addin (click "Show Task Pane" in the ribbon).
-
Hover near the top-right corner of the addin and click the
iicon. -
Click "Clear Web Cache" and wait a few moments.
Fetching Files from the Internet
- Add the following code snippet to
src\functions\functions.jsand save:
/**
 * Download file and write data
 * @customfunction
 * @param {string} url URL to fetch and parse
 * @returns {any[][]} Worksheet data
 */
export async function extern(url) {
  try {
    /* Fetch Data */
    const res = await fetch(url);

    /* Get Data */
    const ab = await res.arrayBuffer();

    /* Parse Data */
    var wb = XLSX.read(ab);

    /* get and return data */
    var ws = wb.Sheets[wb.SheetNames[0]]; // get first worksheet
    var aoa = XLSX.utils.sheet_to_json(ws, { header: 1 }); // get data as array of arrays
    return aoa;
  } catch(e) { return [[e.message || e]]; } // pass error back to Excel
}
-
Close the terminal window and the Excel window (do not save the Excel file).
-
In a new terminal window, start the development process again:
npm run stop
npm start
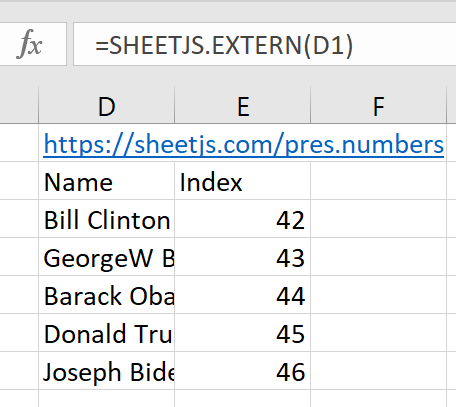
- Enter the text
https://docs.sheetjs.com/pres.numbersin cellD1. Enter the formula=SHEETJS.EXTERN(D1)in cellD2and press Enter.
Excel should pull in the data and generate a dynamic array. The worksheet should match the screenshot at the top of this page.
SheetJS Pro offers additional features that can be used in Excel Custom Functions and Add-ins.