Flat Data Processing in GitHub
Git is a popular system for organizing a historical record of text files and changes. Git can also store and track spreadsheets.
GitHub hosts Git repositories and provides infrastructure to execute workflows. The "Flat Data" project explores storing and comparing versions of structured data using GitHub infrastructure.
SheetJS is a JavaScript library for reading and writing data from spreadsheets.
This demo uses SheetJS in GitHub to process spreadsheets. We'll explore how to fetch and process spreadsheets at regular intervals, and how to keep track of changes over time.
"Excel to CSV" is an official example that pulls XLSX workbooks from an endpoint and uses SheetJS to parse the workbooks and generate CSV files.
The following diagram depicts the data dance:
Flat Data
Many official data releases by governments and organizations include XLSX or XLS files. Unfortunately some data sources do not retain older versions.
Software developers typically use version control systems such as Git to track changes in source code.
The "Flat Data" project starts from the idea that the same version control systems can be used to track changes in data. Third-party data sources can be snapshotted at regular intervals and stored in Git repositories.
Components
As a project from the company, the entire lifecycle uses GitHub offerings:
- GitHub.com1 offers free hosting for Git repositories
- GitHub Actions2 infrastructure runs tasks at regular intervals
githubocto/flat3 library helps fetch data and automate post-processingflat-postprocessing4 library provides post-processing helper functions- "Flat Viewer"5 displays structured CSV and JSON data from Git repositories
A GitHub account is required. When the demo was last tested, "GitHub Free" accounts had no Actions usage limits for public repositories6.
Private GitHub repositories can be used for processing data, but the Flat Viewer will not be able to display private data.
Data Source
Any publicly available spreadsheet can be a valid data source. The process will fetch the data on specified intervals or events.
For this demo, https://docs.sheetjs.com/pres.xlsx will be used.
Action
The githubocto/flat action can be added as a step in a workflow:
      - name: Fetch data
        uses: githubocto/flat@v3
        with:
          http_url: https://docs.sheetjs.com/pres.xlsx
          downloaded_filename: data.xlsx
          postprocess: ./postprocess.ts
This action performs the following steps:
http_urlwill be fetched and saved todownloaded_filenamein the repo. This can be approximated with the following command:
curl -L -o data.xlsx https://docs.sheetjs.com/pres.xlsx
- After saving, the
postprocessscript will be run. When a.tsfile is the script, it will run the script in the Deno runtime. Thepostprocessscript is expected to read the downloaded file and create or overwrite files in the repo. This can be approximated with the following command:
deno run -A ./postprocess.ts data.xlsx
- The action will compare the contents of the repo, creating a new commit if
the source data or artifacts from the
postprocessscript changed.
Post-Processing Data
The flat-postprocessing library includes a number of utilities for different
data formats. The readXLSX helper uses SheetJS under the hood.
The library uses an older version of the SheetJS library. To use the latest releases, the examples import from the SheetJS CDN:
// @deno-types="https://cdn.sheetjs.com/xlsx-0.20.3/package/types/index.d.ts"
import * as XLSX from 'https://cdn.sheetjs.com/xlsx-0.20.3/package/xlsx.mjs';
See the "Deno" installation section for more details.
Post-Process Script
The first argument to the post-processing script is the filename.
The SheetJS readFile method7 will read the file and generate a SheetJS
workbook object8. After extracting the first worksheet, sheet_to_csv9
generates a CSV string.
After generating a CSV string, the string should be written to the filesystem
using Deno.writeFileSync10. By convention, the CSV should preserve the file
name stem and replace the extension with .csv:
// @deno-types="https://cdn.sheetjs.com/xlsx-0.20.3/package/types/index.d.ts"
import * as XLSX from 'https://cdn.sheetjs.com/xlsx-0.20.3/package/xlsx.mjs';
/* load the codepage support library for extended support with older formats  */
import * as cptable from 'https://cdn.sheetjs.com/xlsx-0.20.3/package/dist/cpexcel.full.mjs';
XLSX.set_cptable(cptable);

/* get the file path for the downloaded file and generate the CSV path */
const in_file = Deno.args[0];
const out_file = in_file.replace(/.xlsx$/, ".csv");

/* read file */
const workbook = XLSX.readFile(in_file);

/* generate CSV from first worksheet */
const first_sheet = workbook.Sheets[workbook.SheetNames[0]];
const csv = XLSX.utils.sheet_to_csv(first_sheet);

/* write CSV */
Deno.writeFileSync(out_file, new TextEncoder().encode(csv));
Complete Example
This was last tested by SheetJS users on 2025-01-15.
https://github.com/SheetJS/flat-sheet is an example from a previous test. The Flat Viewer URL for the repo is https://flatgithub.com/SheetJS/flat-sheet/
Create Project
-
Create a free GitHub account or sign into the GitHub web interface.
-
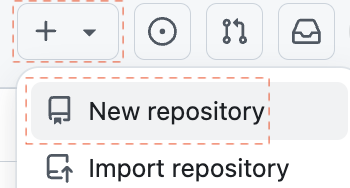
Create a new repository by clicking the "+" icon in the upper-right corner and selecting "New repository" in the dropdown.
- In the "Create a new repository" page, enter the following information:
- "Repository name":
flat-sheet - Ensure "Public" is selected
- Check "Add a README file"
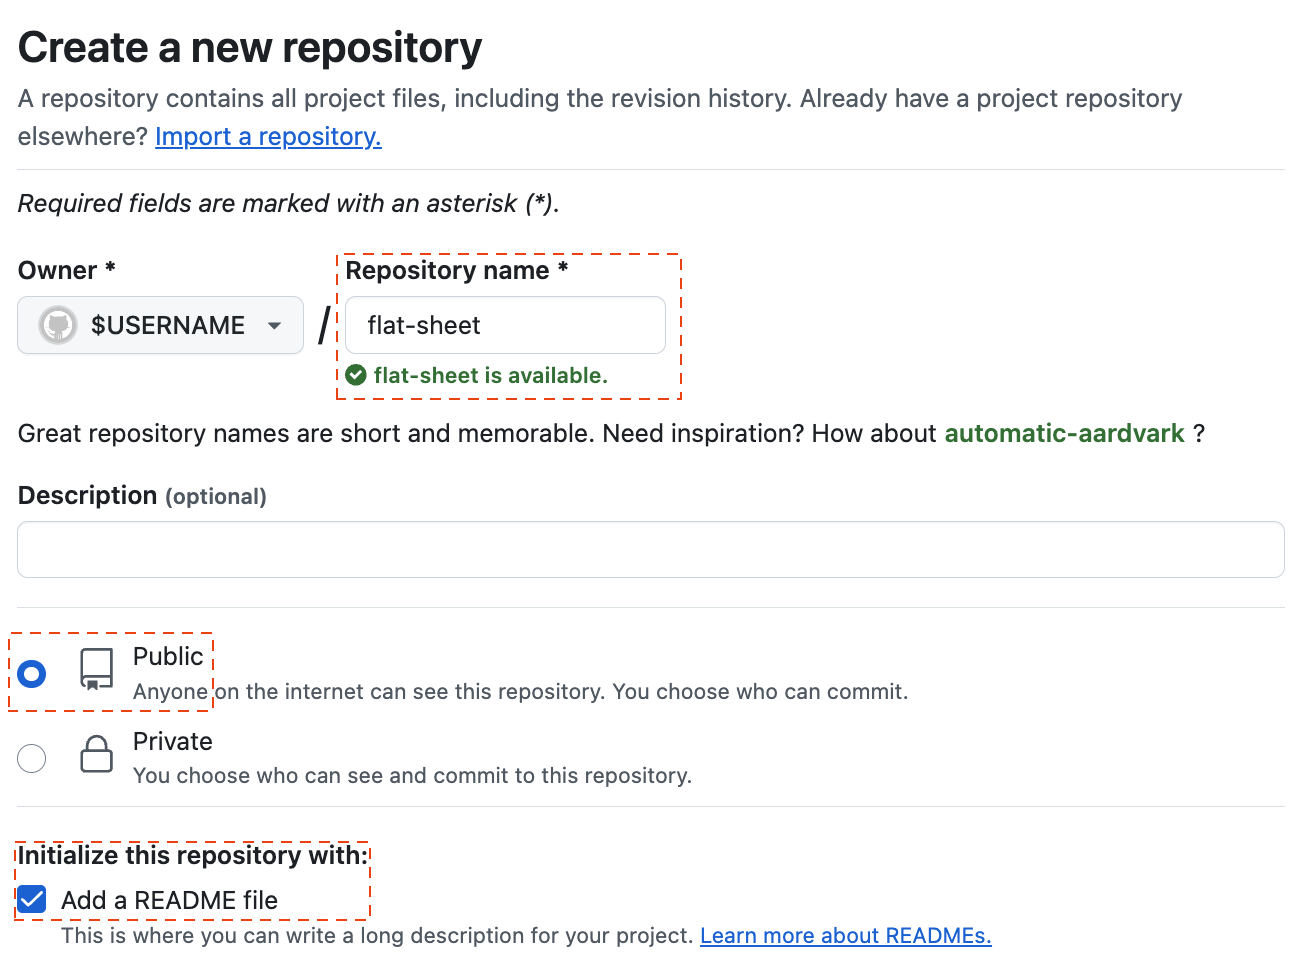
Click "Create repository" at the bottom to create the new repository.
You will be redirected to the new project.
Add Code
- In the browser URL bar, change "github.com" to "github.dev". For example, if
the URL was originally
https://github.com/SheetJS/flat-sheet, the new URL should behttps://github.dev/SheetJS/flat-sheet. Press Enter.
In some tests, there was a prompt:
The extension 'GitHub Repositories' wants to sign in using GitHub.
Click "Allow" and select your user account when prompted.
- In the left "EXPLORER" panel, double-click just below README.md. A text box
will appear just above README. Type
postprocess.tsand press Enter.
The main panel will show a postprocess.ts tab. Copy the following code to the
main editor window:
// @deno-types="https://cdn.sheetjs.com/xlsx-0.20.3/package/types/index.d.ts"
import * as XLSX from 'https://cdn.sheetjs.com/xlsx-0.20.3/package/xlsx.mjs';
/* load the codepage support library for extended support with older formats  */
import * as cptable from 'https://cdn.sheetjs.com/xlsx-0.20.3/package/dist/cpexcel.full.mjs';
XLSX.set_cptable(cptable);

/* get the file path for the downloaded file and generate the CSV path */
const in_file = Deno.args[0];
const out_file = in_file.replace(/.xlsx$/, ".csv");

/* read file */
const workbook = XLSX.readFile(in_file);

/* generate CSV */
const first_sheet = workbook.Sheets[workbook.SheetNames[0]];
const csv = XLSX.utils.sheet_to_csv(first_sheet);

/* write CSV */
Deno.writeFileSync(out_file, new TextEncoder().encode(csv));
- In the left "EXPLORER" panel, double-click just below README.md. A text box
will appear. Type
.github/workflows/data.yamland press Enter.
Copy the following code into the main area. It will create an action that runs roughly once an hour:
name: flatsheet

on:
  workflow_dispatch:
  schedule:
    - cron: '0 * * * *'

jobs:
  scheduled:
    runs-on: ubuntu-latest
    steps:
      - name: Setup deno
        uses: denoland/setup-deno@main
        with:
          deno-version: v1.x
      - name: Check out repo
        uses: actions/checkout@v2
      - name: Fetch data
        uses: githubocto/flat@v3
        with:
          http_url: https://docs.sheetjs.com/pres.xlsx
          downloaded_filename: data.xlsx
          postprocess: ./postprocess.ts
-
Click on the source control icon (a little blue circle with the number 2). In the left panel, select the Message box, type
initand press CTRL + Enter on Windows (Command + Enter on MacOS). -
Click the
☰icon and click "Go to Repository" to return to the repo page.
Test Action
- Click "Settings" near the top of the page to see the repository settings. In the left column, click "Actions" to expand the submenu and click "General".

Scroll down to "Workflow permissions" and select "Read and write permissions" if it is not selected. Click "Save".

- Click "Actions" to see the workflows.
In some tests, GitHub showed the following screen:
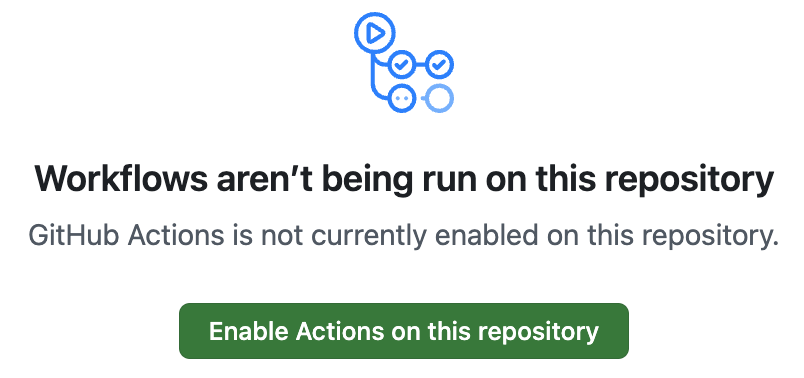
Click "Enable Actions on this repository".
In the left column, click flatsheet.
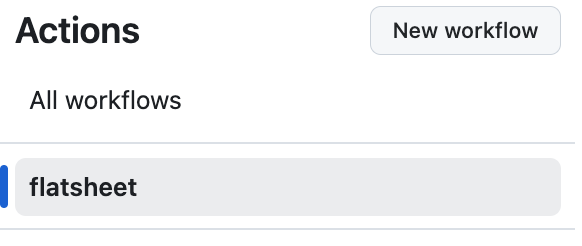
This is the page for the action. Every time the action is run, a new entry will be added to the list.
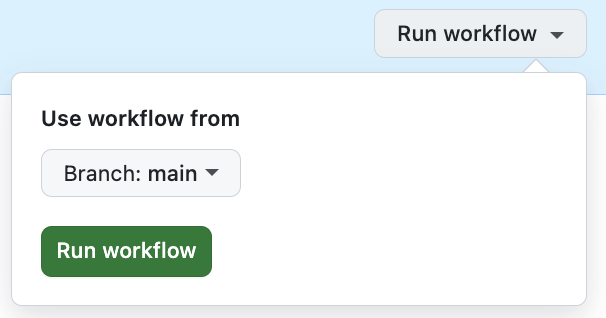
- Click "Run workflow", then click the "Run workflow" button in the popup. This will start a new run.
After about 30 seconds, a new row should show up in the
main area. The icon should be a white ✓ in a green circle.

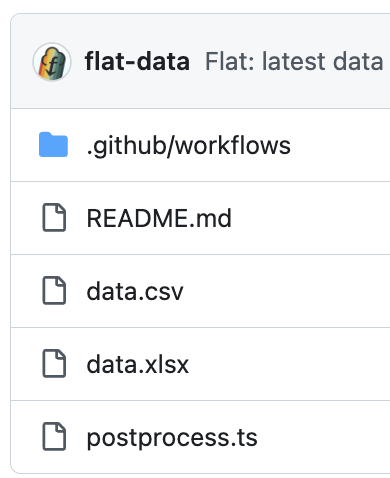
- Click "Code" near the top of the page to return to the main view. The file
listing will include
data.xlsx(fetched file) anddata.csv(generated data):
- Repeat step 10 to run the action a second time. Click "Code" again.
Viewer
- Go to the URL bar and change "github.com" to "flatgithub.com". For example,
if the URL was originally
https://github.com/SheetJS/flat-sheet, the new URL will behttps://flatgithub.com/SheetJS/flat-sheet. Press Enter.
You will see the "Flat Viewer". In the top bar, the "Commit" option allows for switching to an older version of the data.
The following screenshot shows the viewer in action:
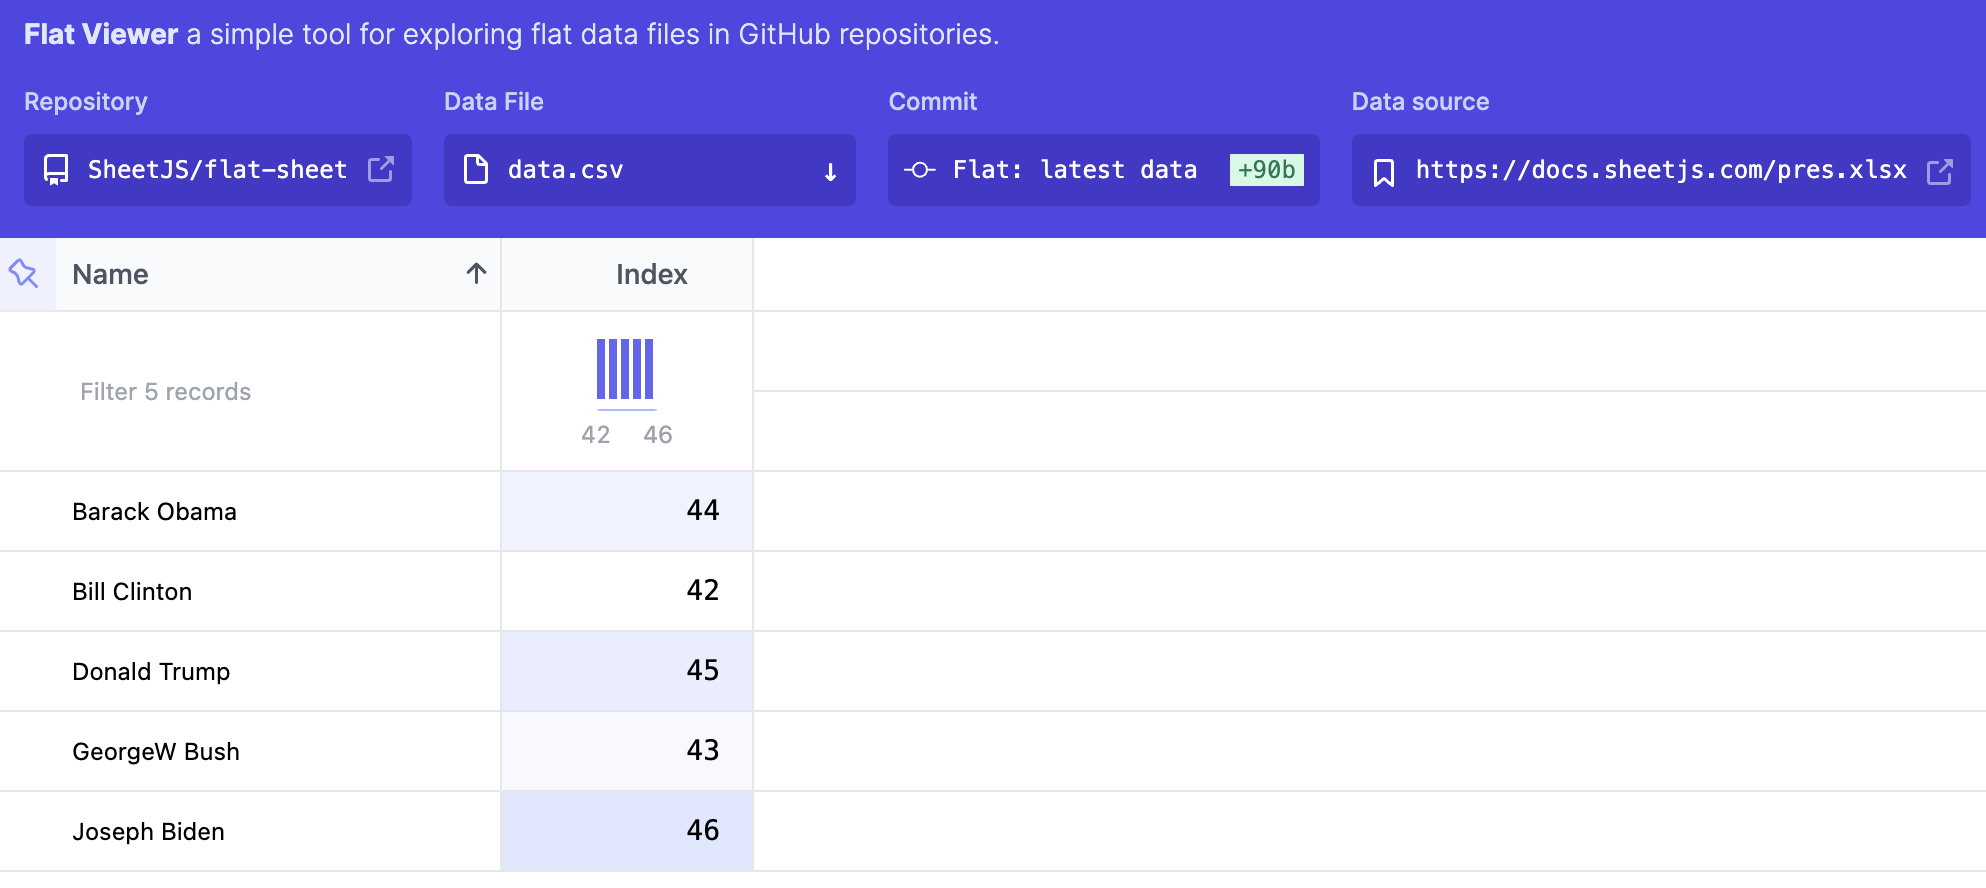
The column chart in the Index column is a histogram.
Footnotes
-
See "Repositories documentation" in the GitHub documentation. ↩
-
See "GitHub Actions documentation" in the GitHub documentation. ↩
-
See
githubocto/flatrepo on GitHub. ↩ -
See
githubocto/flat-postprocessingrepo on GitHub. ↩ -
The hosted version is available at https://flatgithub.com/ ↩
-
See "About billing for GitHub Actions" in the GitHub documentation. ↩
-
See "Workbook Object" ↩
-
See
Deno.writeFileSyncin the Deno Runtime APIs documentation. ↩