Oracle Cloud Infrastructure
Oracle Cloud Infrastructure (OCI) is a cloud services platform for building and deploying line of business applications.
SheetJS is a JavaScript library for reading and writing data from spreadsheets.
This demo explores the "Visual Builder Studio" (VBS) environment1. We'll use VBS and SheetJS to build a web application that handles Excel files.
In the "Complete Example", we'll create an application that imports data from spreadsheet, stores data in "Business Objects"2, displays data in table components, and exports Business Objects to new spreadsheets.
Oracle Cloud Infrastructure iterates quickly and there is no guarantee that the referenced services will be available in the future.
This demo was last tested on 2025-02-04.
Visual Applications
"Visual Builder Studio", a core Oracle Cloud Infrastructure offering, is a browser-based development environment for creating web applications with drag-and-drop components.
Installation
SheetJS libraries conform to Visual Builder Studio ECMAScript3 requirements. They can be loaded in VBS applications at different points in the app lifecycle.
RequireJS Module
The SheetJS Standalone scripts
comply with AMD define semantics. They support define out of the box.
Module Alias
Unlike other platforms, Oracle Visual Builder define requires module aliases.
Aliases are stored in app-flow.json. SheetJS scripts are designed to use the
xlsx alias.
An alias can be added in Visual Builder Studio with the following steps:
- Click 📄
Sourcefrom the left sidebar. - Expand the
webAppsfolder. - Expand the subfolder whose name matches the "Application Name" for the site.
- Open
app-flow.jsonwithin the folder from step 3. - Add the following lines after line 5:
  "requirejs": {
    "paths": {
      "xlsx": "https://cdn.sheetjs.com/xlsx-0.20.3/package/dist/xlsx.full.min"
    }
  },
Script Reference
After defining the alias, action chains can load the module using define:
define([
  "xlsx",
  /* ... other libraries ... */
  'vb/action/actionChain', 'vb/action/actions'
], (
  XLSX,
  /* ... variables for the other libraries ... */
  ActionChain, Actions
) => {
  class MyActionChain extends ActionChain {
    async run(context) {
      console.log(XLSX.version); // use XLSX in the callback
    }
    /* ... other methods ... */
  }
  return MyActionChain;
});
HTML
SheetJS Standalone scripts can
be loaded with a SCRIPT tag in the index.html entry page for the app.
Typically this file is stored in the app folder.
For example, if the app is named sheetjs_demo_app, the entrypoint HTML file is
webApps/sheetjs_demo_app/index.html.
The script should be added in the HEAD block:
<script src="https://cdn.sheetjs.com/xlsx-0.20.3/package/dist/xlsx.full.min.js"></script>
This will expose the XLSX global object, which includes the functions listed
in the "API Reference" section of the documentation.
The Visual Builder scripts are injected at <!-- visualBuilderScripts -->. This
comment is typically in the BODY block:
<body class="oj-web-applayout-body vb-web-applayout-body">

  <oj-vb-content config="[[vbApplication]]"></oj-vb-content>

  <!-- visualBuilderScripts -->
Adding the SheetJS Standalone script to the HEAD block ensures the script will
be processed before loading Oracle Visual Builder scripts.
Business Objects
"Business Objects"2 in Oracle VBS provides a server-side model implementation for persistent data storage.
Think of them as a combination of a data model and database table that handles both data storage and UI binding.
Business Object Definition
The example presidents sheet has a header row with "Name" and "Index" columns. In Oracle VBS, we model this as a Business Object with two fields.
Schema
Fields in Business Objects must have a specified type. A sample business object definition for the following schema is shown below:
| Field ID | Type | Field Label |
|---|---|---|
name | string | Name |
index1 | number | Index |
{ "items" : [ {
    "name": "Pres",
    "fields": {
      "name": { "type": "string", "label": "Name" },
      "index1": { "type": "number", "label": "Index" }
    }
} ] }
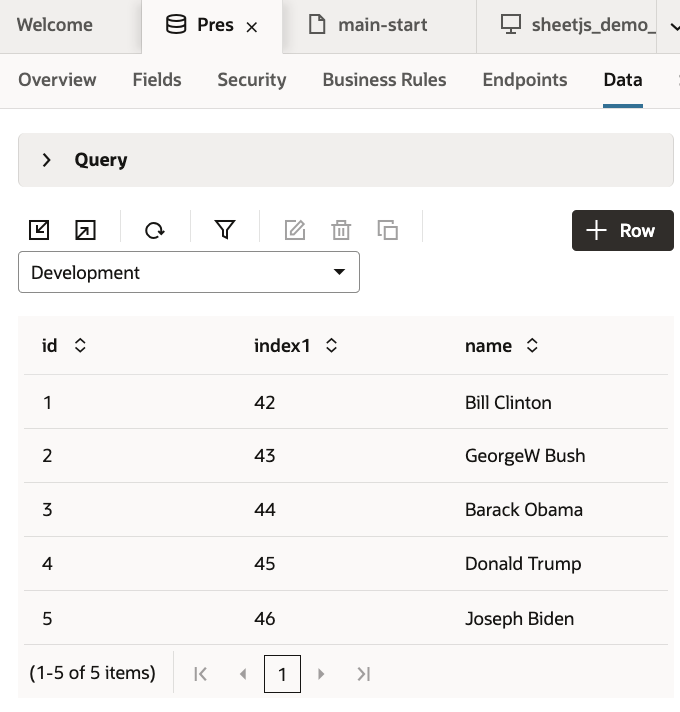
Data
Actions can query data from the Business Object with REST calls. The items
property of the response is an array of objects.
Fields are identified by Field ID. The field names do not appear in the result.
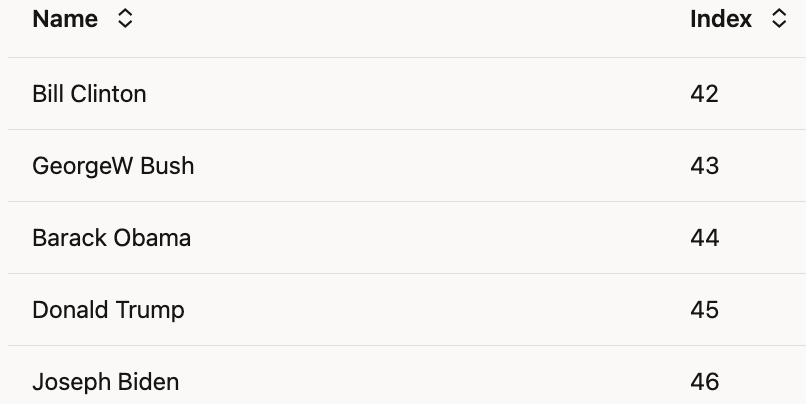
| Spreadsheet | Query Result |
|---|---|
| |

Updating Business Object
Starting from a spreadsheet file, the SheetJS read
method parses the data into a workbook object. After selecting a worksheet,
sheet_to_json generates row objects.
Using the auto-generated REST API, new Business Object records can be created.
Here is a sample flow diagram and method for downloading a workbook, generating rows from the first worksheet, and updating a Business Object2:
  define(['vb/action/actionChain', 'vb/action/actions', 'xlsx'], (ActionChain, Actions, XLSX) => {
    class ButtonActionChain extends ActionChain {
      async run(context) {
        /* fetch spreadsheet file */
        const url = "https://docs.sheetjs.com/pres.xlsx";
        const data = await (await fetch(url)).arrayBuffer();

        /* parse */
        const wb = XLSX.read(data);
        /* convert the first worksheet to json */
        const ws = wb.Sheets[wb.SheetNames[0]];
        const jsonData = XLSX.utils.sheet_to_json(ws);

        for (const row of jsonData) { // loop over data rows
          /* create object that follows business object definition */
          const presData = {
            name: row.Name,
            index1: Number(row.Index)
          };

          /* update business object with new record */
          await Actions.callRest(context, {
            endpoint: 'businessObjects/create_Pres',
            body: presData
          });
        }
      }
    }
    return ButtonActionChain;
  });
Rendering Data
In Oracle VBS, the table component oj-table4 supports direct binding to
Business Objects for data display. The view structure specifies the data source
binding and column layout.
When using the design mode to add a Table, VBS will use a ServiceDataProvider
with columns based on the specified Endpoint Structure. The following view code
was generated when testing the "Complete Example":
<div class="oj-flex">
  <!-- Data source for the table -->
  <oj-table scroll-policy="loadMoreOnScroll" class="oj-flex-item oj-sm-12 oj-md-12"
    data="[[$variables.presListSDP]]"
    columns='[
      {"headerText":"Name","field":"name"},
      {"headerText":"Index","field":"index1"}
    ]'>
  </oj-table>
</div>
Exporting Business Objects
The export functionality converts Business Object data into an Excel spreadsheet. The process involves retrieving data through REST API call, transforming it into a format suitable for SheetJS, and generating an XLSX file. Here's the complete flow:
define(['vb/action/actionChain', 'vb/action/actions', 'xlsx'], (ActionChain, Actions, XLSX) => {
  class ButtonActionChain1 extends ActionChain {
    async run(context) {
      // get pres data
      const presDataResponse = await Actions.callRest(context, {
        endpoint: 'businessObjects/getall_Pres',
        parameters: {
          fields: 'name,index1'
        }
      });

      // transform to simple array
      const simplifiedData = presDataResponse.body.items.map(item => ({
        Name: item.name,
        Index: item.index1
      }));

      // generate workbook
      const ws = XLSX.utils.json_to_sheet(simplifiedData);
      const wb = XLSX.utils.book_new(ws, "Presidents");

      // export to XLSX which triggers a download
      XLSX.writeFileXLSX(wb, "SheetJSOracleVisualBuilderAoO.xlsx");
    }
  }
  return ButtonActionChain1;
});
Importing Data
The import functionality enables data transfer from an Excel spreadsheet into the Oracle VBS application. The process begins by fetching the XLSX file, parsing it using SheetJS, and then creating corresponding Business Object records.
define([
  'vb/action/actionChain',
  'vb/action/actions',
  'vb/action/actionUtils',
  'xlsx'
], (
  ActionChain,
  Actions,
  ActionUtils,
  XLSX
) => {
  'use strict';

  class ButtonActionChain extends ActionChain {

    /**
     * @param {Object} context
     */
    async run(context) {
      const { $page, $flow, $application, $constants, $variables } = context;

      // fetch XLSX file
      const url = "https://docs.sheetjs.com/pres.xlsx";
      const data = await (await fetch(url)).arrayBuffer();
      const wb = XLSX.read(data);

      // get the first worksheet
      const ws = wb.Sheets[wb.SheetNames[0]];

      // convert to json
      const jsonData = XLSX.utils.sheet_to_json(ws);

      // process each row and create business object records
      for (const row of jsonData) {
        const presData = {
          name: row.Name,
          index1: Number(row.Index)
        };

        // create a business object record
        await Actions.callRest(context, {
          endpoint: 'businessObjects/create_Pres',
          body: presData
        });
      }
    }
  }
  return ButtonActionChain;
});
Exporting Data
The export functionality allows you to convert Business Object data into Excel spreadsheets. This process involves retrieving data from the Business Object using REST API calls, transforming it into a format suitable for SheetJS, and generating an XLSX file.
define([
  'vb/action/actionChain',
  'vb/action/actions',
  'vb/action/actionUtils',
  'xlsx'
], (
  ActionChain,
  Actions,
  ActionUtils,
  XLSX
) => {
  'use strict';

  class ButtonActionChain1 extends ActionChain {

    /**
     * @param {Object} context
     */
    async run(context) {
      const { $page, $flow, $application, $constants, $variables } = context;

      // get pres data
      const presDataResponse = await Actions.callRest(context, {
        endpoint: 'businessObjects/getall_Pres',
        parameters: {
          fields: 'name,index1'
        }
      });

      // transform to simple array
      const simplifiedData = presDataResponse.body.items.map(item => ({
        Name: item.name,
        Index: item.index1
      }));

      // generate workbook
      const ws = XLSX.utils.json_to_sheet(simplifiedData);
      const wb = XLSX.utils.book_new(ws, "Presidents");

      /* export to XLSX */
      XLSX.writeFileXLSX(wb, "SheetJSOracleVisualBuilderAoO.xlsx");

    }
  }
  return ButtonActionChain1;
});
Complete Example
At the time of writing, Oracle Cloud offers a 30-day free trial that includes Visual Builder Studio access.
-
If you do not have one, create a new Oracle Cloud free tier account5.
-
Sign in to the Oracle Cloud Management Console.
Visual Builder Setup
In this section, we will configure VBS and create a new instance.
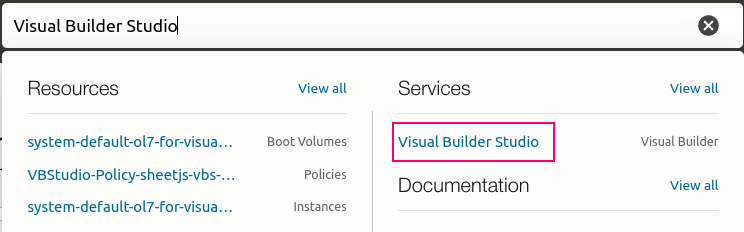
- Type "Visual Builder Studio" in the top search box and click "Visual Builder Studio" in the "Services" section.
- Click
Visual Builderin the left sidebar. In the "List scope" section, if no Compartment is selected, click the dropdown and select a Compartment.
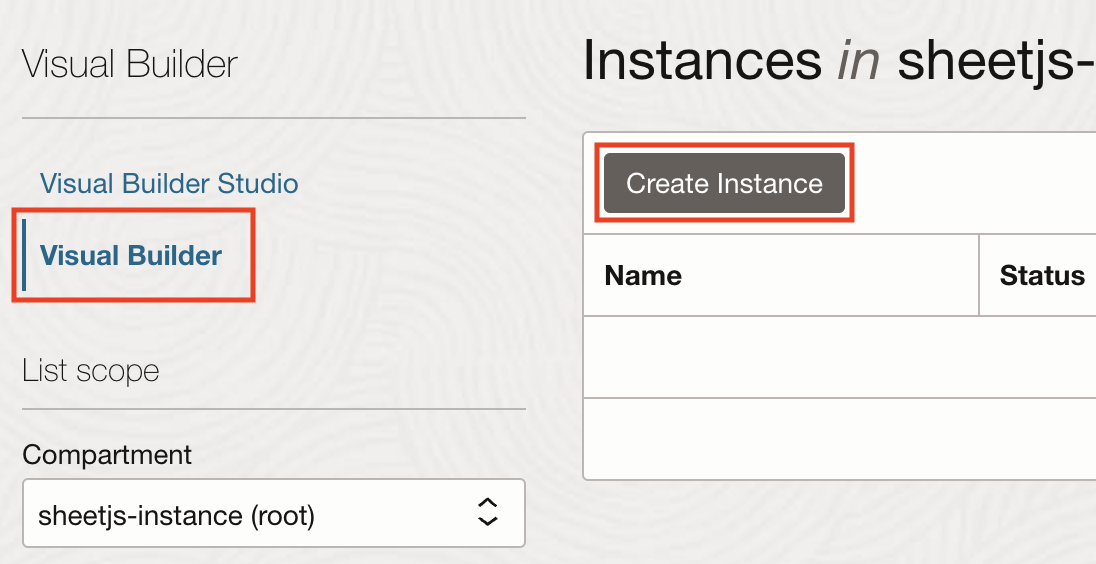
- Click "Create Instance".
In the Create Instance panel, enter the following options:
- Name:
sheetjs-demo-vb-instance - Nodes:
1(it cannot be changed in a Free account) - Choose network access:
Default (No access rules.)
The panel should look like the following screenshot:
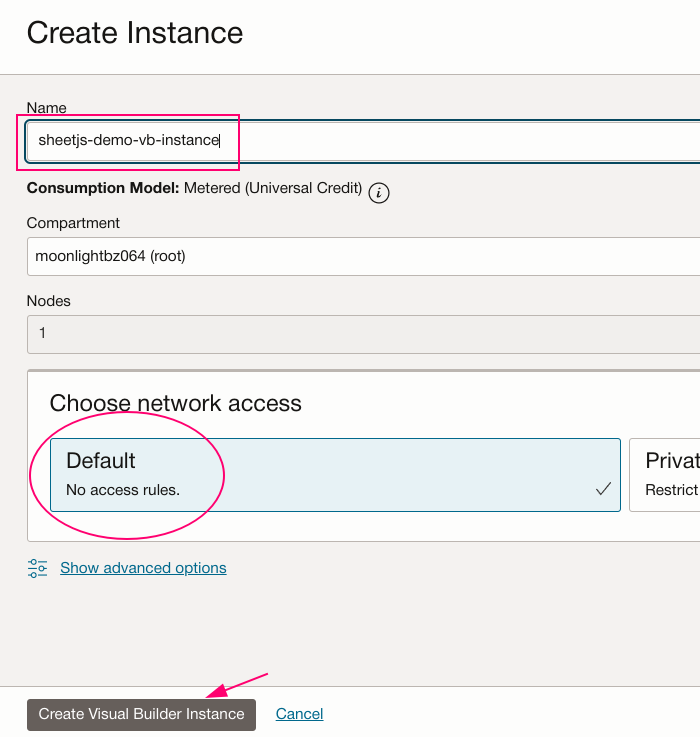
- Click "Create Visual Builder Instance". The panel will close.
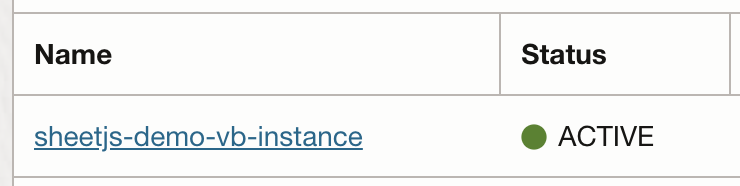
The instances table will include a new row for sheetjs-demo-vb-instance. When
the instance is ready, the status will change to "ACTIVE".
-
Click "Visual Builder Studio" in the left sidebar.
-
Click "Create Visual Builder Studio" in the main area.
In the Create Visual Builder Studio Instance panel, type sheetjs-vbs-instance
in the Instance Name textbox and click "Next"
In the "CI/CD Setup" page, ensure "Yes, I authorize this" is checked. Select the
compartment in the dropdown and click Create Visual Builder Studio.
You will be redirected to the instance page.
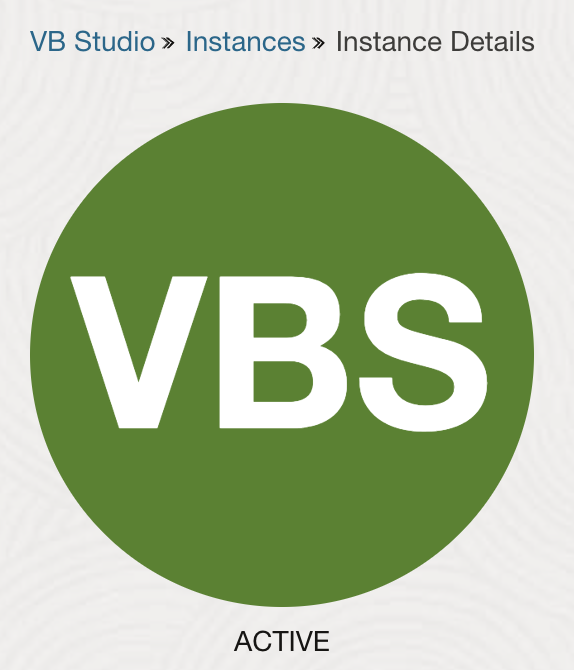
- Wait for the instance to be completed. The large circle will be green.
-
Click
Service Console. You will be redirected to the organization page. -
Scroll down and select the "Projects" tab. Click the "+ Create" button to create a new project. The "New Project" wizard has 4 steps:
-
In "Project Details", enter the Name
sheetjs-demo-projectand click "Next" -
In "Project Template", select
Empty Projectand click "Next" -
In "Project Properties" page, select
Markdownand click "Next" -
Click "Finish" (by default, the current user will be the "Project Owner")
You will be redirected to a provisioning page while resources are allocated:
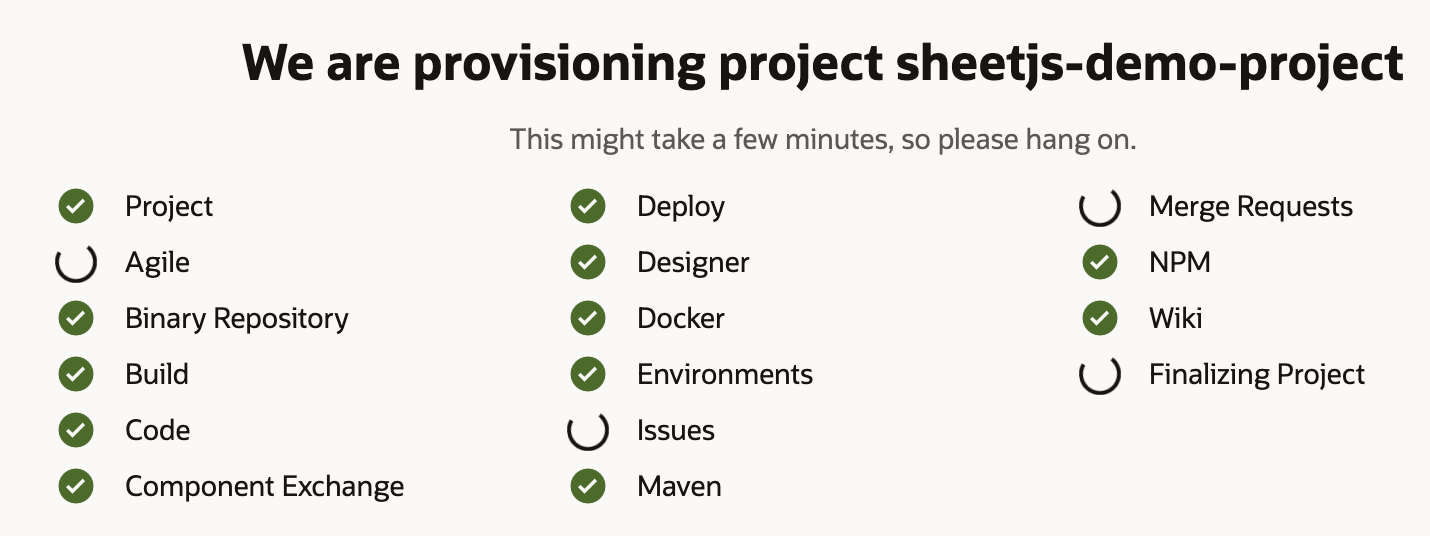
Once allocated, you will be redirected to the project page.
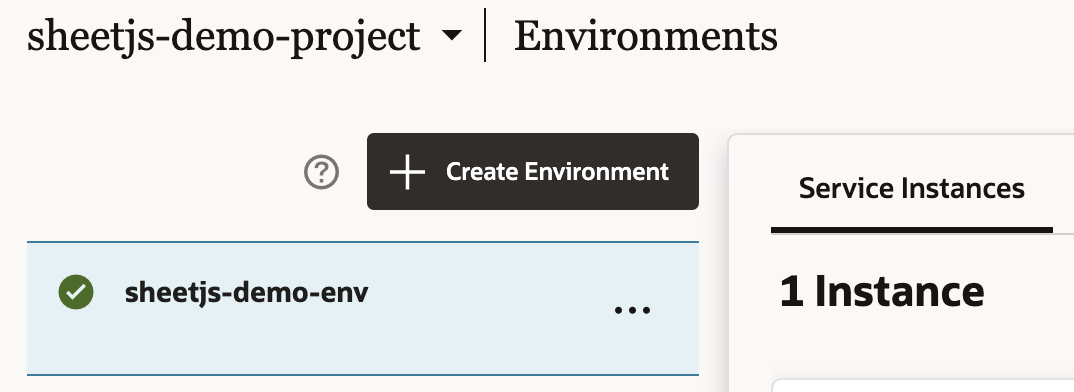
- Click "⌂ Project Home" in the left sidebar and click "+ Create Environment".
In the popup, type sheetjs-demo-env in the "Environment Name" text box and
click "Create". You will be redirected to the Environments page.
- Click
+ Add Instance. In the modal, select the following:
- Instance Type: "Visual Builder and Oracle Integration"
- Add Instance Using: "Instance List"
- Check the box in the
sheetjs-demo-vb-instancetable row.
The selections should match the following screenshot:
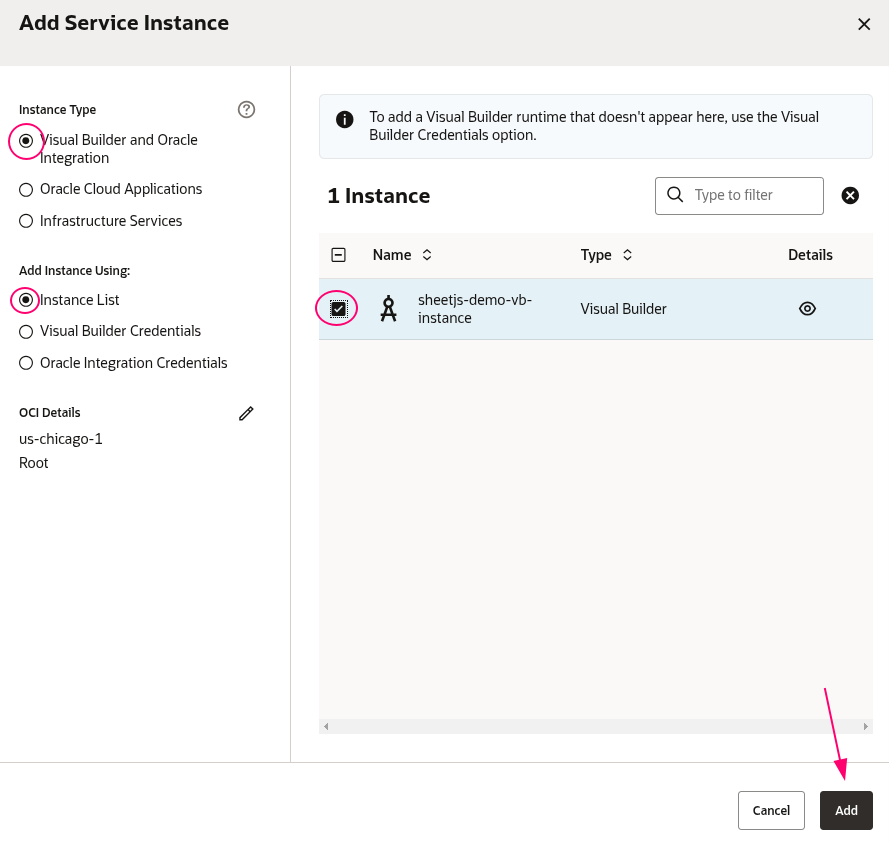
After making the selections, click "Add". Once the instance is created, there
will be a checkmark next to sheetjs-demo-env in the main area.
- Select the "Service Instances" tab and find the
sheetjs-demo-vb-instancecard. If "Instance URL" is not shown, click "Details" to show the URL.
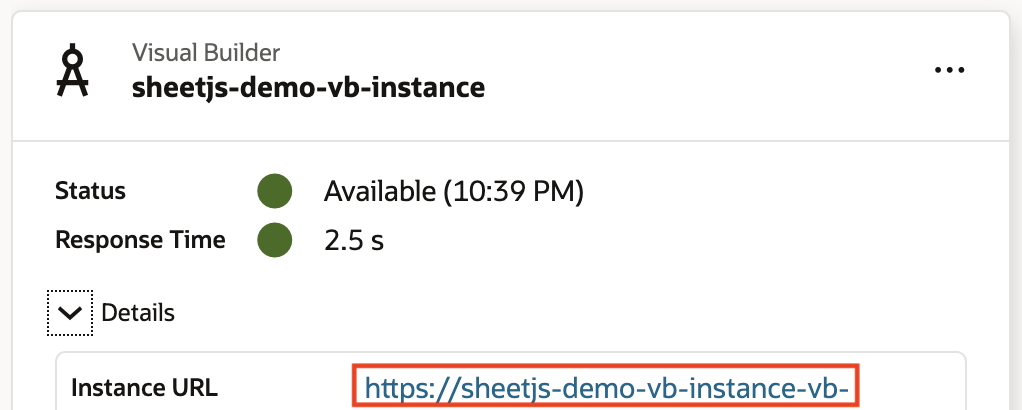
Click the "Instance URL". Visual Builder will be launched in a new window.
- Click "+ New Application". In the popup, enter the following options:
- Application Display Name:
sheetjs-vbs-demo - Application Name:
sheetjs_vbs_demo(automatic) - Application Template:
Empty Application(default)
Click "Finish". After a short wait, the browser will redirect to the new app.
Business Object Setup
In this section, we will create a new Business Object.
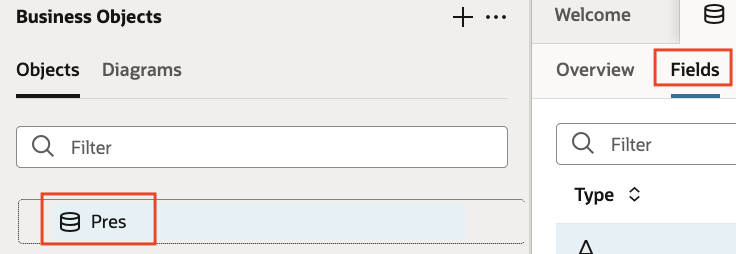
- Click the Business Objects card in the Welcome tab or the "⛁" icon in the left sidebar. The "Business Objects" panel will be displayed.

Click "+ Business Object". In the popup, enter the following:
- Name:
Pres - Display Label:
President
Click "Create". You will be redirected to the Business Object page.
- Select
Presin the Business Objects panel and select the "Fields" tab.
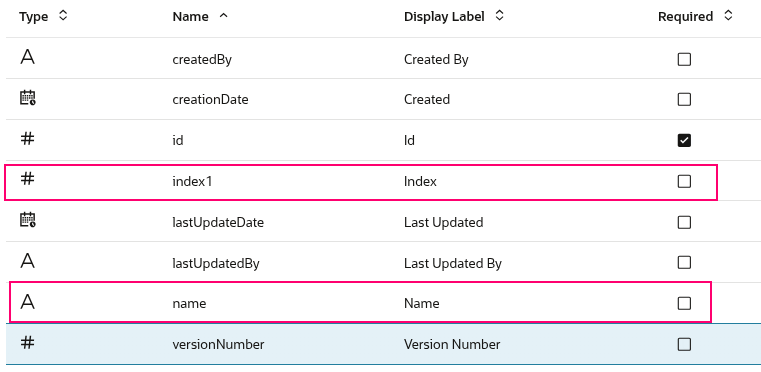
- Click "+ Field" and select "Field" in the dropdown. In the displayed form, enter the following options:
- Label:
Name - Type: Click
A(Stringwill be displayed next to Type)
Click "Create Field".
- Click "+ Field" and select "Field" in the dropdown. In the displayed form, enter the following options: (we are creating a second field)
- Label:
Index - Type: Click
#(Numberwill be displayed next to Type)
Click "Create Field".
- Scan the main table and verify that two new rows were added:
Web App Creation
In this section, we will create a new web application.
- Click "🖥️ Web Applications" in the left bar and click "+ Web Application". In the popup, enter the following options:
- Application Name:
sheetjs_demo_app - Navigation Style:
None
Click "Create". You will be redirected to the page designer.
If prompted to share clipboard, select "Allow".
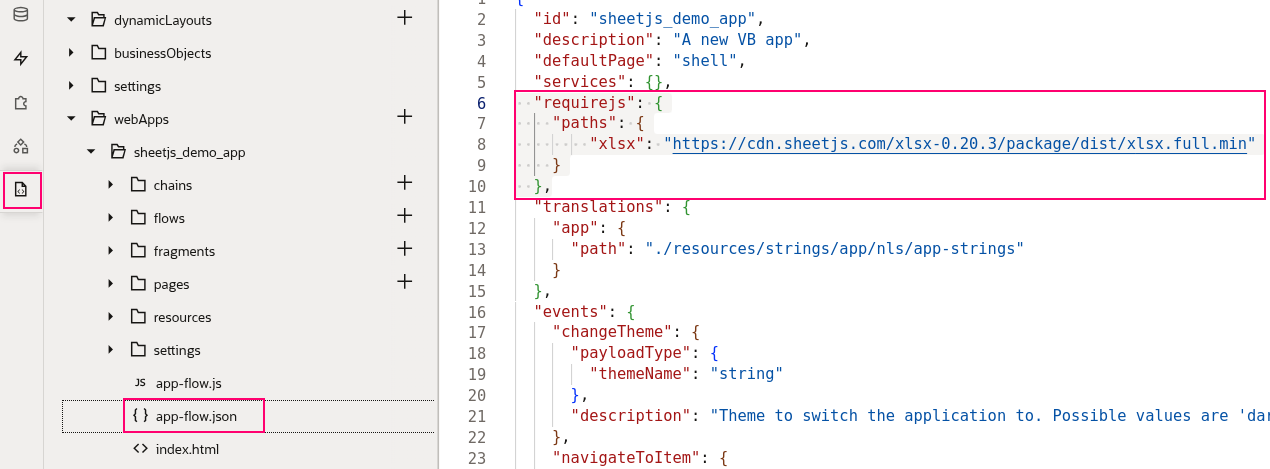
SheetJS Alias
In this section, we will create an alias to the SheetJS standalone script hosted on the SheetJS CDN
-
Click 📄
Sourcefrom the left sidebar. -
In the file tree, if
app-flow.jsonis not visible, click the triangle next tosheetjs_demo_appto expand the folder.
Clicking on the sheetjs_demo_app name has no effect! You must click the
triangle next to the label to expand the folder.
- Select
app-flow.jsonwithin thesheetjs_demo_appfolder.
A new code window will be displayed in the main area.
- Copy the following codeblock and insert it after line 5 in the code editor:
  "requirejs": {
      "paths": {
        "xlsx": "https://cdn.sheetjs.com/xlsx-0.20.3/package/dist/xlsx.full.min"
      }
  },
The following screenshot shows the result after inserting the code:
App Interface
In this section, we will create the UI for the application. It will include two buttons for import/export and a table for displaying data.
-
Click "🖥️ Web Applications" in the left sidebar.
-
In the tree, if
main-startis not visible, click the triangle next tomainto expand the folder.
Clicking on the main name does not expand the tree! You must click the
triangle next to the label to expand the subtree.
-
Select
main-startwithin themainsection. -
Select the "Page Designer" tab and select the "Design" tab.
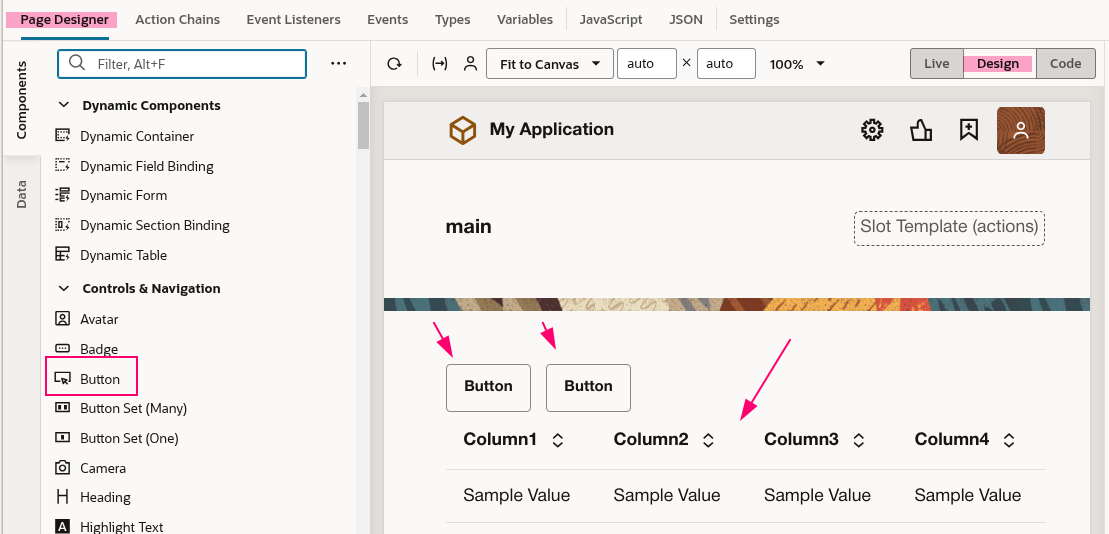
In the page designer, drag and drop two Button components and one Table
Component to the canvas.
The "Table" component is in the "Collections" section. Do not add a "Dynamic Table"!
Actions Setup
In this section, we will add event handlers for the import and export buttons.
-
Select the first button in the canvas.
-
In the right panel, select the "General" tab. Enter the following details:
- ID:
import-xlsx - Label:
Import XLSX
Press Enter after typing the label. The canvas will refresh.
-
Select the "Events" tab and click "+ Event Listener". In the dropdown, click
🔔 On 'ojAction'. -
Click "Action Chains" in the top bar (next to "Page Designer").
-
Select "Code" in the top-right tab.
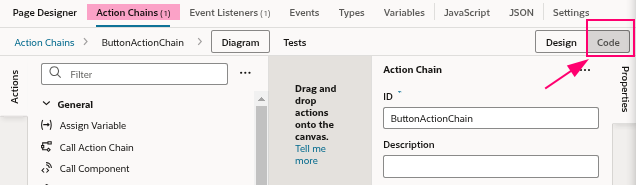
The main area will show a code editor.
-
Copy the "Importing Data code" example code and paste in the code editor.
-
Click "Page Designer" to return to the page designer.
-
Select the second button in the canvas (not the "Import XLSX" button!)
-
In the right panel, select the "General" tab. Enter the following details:
- ID:
export-xlsx - Label:
Import XLSX
Press Enter after typing the label. The canvas will refresh.
-
Select the "Events" tab and click "+ Event Listener". In the dropdown, click
🔔 On 'ojAction'. -
Click "Action Chains" in the top bar (next to "Page Designer").
-
Select "Code" in the top-right tab.
-
Copy the "Exporting Data code" example code and paste in the code editor.
Data Binding
In this section, we will connect the Pres Business object to the Table.
-
Click "Page Designer" to return to the page designer.
-
Select the Table component in the canvas.
-
In the right panel, select the "Quick Start" tab and click "Add Data".
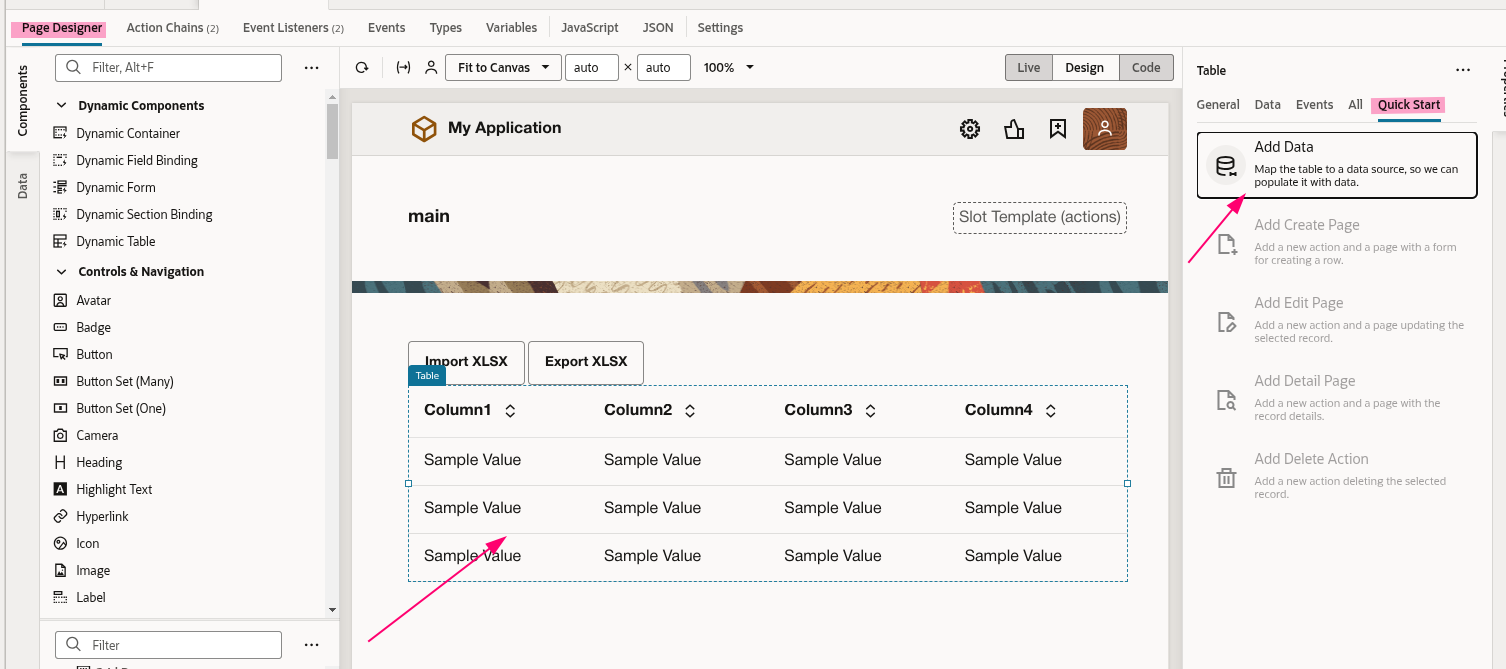
- Complete the "Add Data" wizard:
-
In "Choose the source of your data", select "Pres" in the "Business Objects" section and click "Next".
-
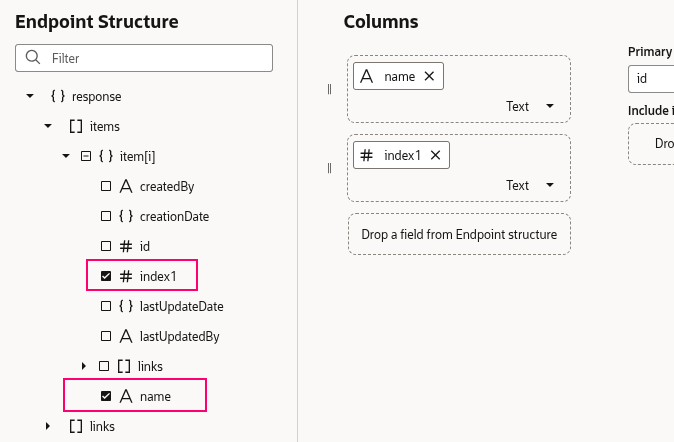
In the next section ("Bind Data"), check the box next to
nameand the box next toindex1. After confirming the page looks like the following screenshot, click "Next".
- In the next section ("Define Query") click "Finish".
App Testing
In this section, we will test import and export functionality.
- Click the Preview button (▶️ icon) in the top-right corner of the page.
The application will be launched in a new browser tab.
-
Click "Import XLSX".
-
Switch back to the Visual Builder window.
-
Click the "⛁" icon in the left sidebar and click the "Pres" Business Object.
-
Switch to the "Data" tab and verify that new data has been added.
In some test runs, no data was added.
Repeat the "SheetJS Alias" steps and confirm the alias exists.
If the alias is missing, add the alias and launch a new Preview window.
- Switch back to the "Preview" window and refresh the page.
The preview will now show the data from the "Pres" Business Object.
- Click the "Export XLSX" button.
The app will attempt to download SheetJSOracleVisualBuilderAoO.xlsx
Save the file and open with a spreadsheet editor. Confirm the spreadsheet matches the data shown in the app.
Footnotes
-
See "Oracle Visual Builder Studio" in the Oracle Cloud documentation. ↩
-
See "Work With Business Objects" in the Oracle Visual Build Studio documentation. ↩ ↩2 ↩3
-
See "JavaScript Support in Oracle VBS" for more details on custom JavaScript functionality and module handling. ↩
-
See Oracle VBS Table Component for more details. ↩
-
Registering for a free account on the Oracle Cloud Free Tier requires a valid phone number and a valid credit card. ↩