Let Data Glide on Glide Data Grid
Glide Data Grid is a high-performance data grid designed for the ReactJS web framework.
SheetJS is a JavaScript library for reading and writing data from spreadsheets.
This demo uses Glide Data Grid and SheetJS to pull data from a spreadsheet and display the content in a data grid. We'll explore how to import data from files into the data grid and how to export modified data from the grid to workbooks.
The "Demo" section includes a complete example that displays data from user-supplied sheets and exports data to XLSX workbooks:
This demo was tested in the following environments:
| Browser | Version | Date |
|---|---|---|
| Chromium 135 | 5.3.2 | 2025-04-23 |
| Konqueror 22 | 5.3.2 | 2025-04-23 |
Glide Data Grid is not compatible with ReactJS 19!
When trying to install in a new project, npm install will fail:
npm error Found: [email protected]
npm error node_modules/react
npm error   react@"^19.0.0" from the root project
npm error
npm error Could not resolve dependency:
npm error peer react@"^16.12.0 || 17.x || 18.x" from @glideapps/[email protected]
npm error node_modules/@glideapps/glide-data-grid
This demo explicitly uses ReactJS 18.
Integration Details
The "Frameworks" section covers installation with Yarn and other package managers.
Using the npm tool, this command installs SheetJS and Glide Data Grid:
npm i --save https://cdn.sheetjs.com/xlsx-0.20.3/xlsx-0.20.3.tgz @glideapps/[email protected]
Methods and components in both libraries can be loaded in pages using import:
import { read, utils, writeFile } from 'xlsx';
import { DataEditor, GridCellKind, GridCell, Item } from '@glideapps/glide-data-grid';
Glide Data Grid is primarily event-based. It does not manage state directly. Instead, developers are expected to manage updates when users edit cells.
Backing Store
Under the hood, the DataEditor component is designed to call methods and
request data to display in the grid. It is typical to store data outside of
component state. A getCellContent callback will pull data from the external
backing store, while SheetJS operations will directly act on the store.
For this demo, there are two parts to the data store:
-
datais an "Array of Objects" that will hold the raw data1. -
headeris an array of the header names
Following the Glide Data Grid conventions2, both objects are defined at the top level of the component script. They are declared outside of the component!
// !! THESE ARRAYS ARE DEFINED OUTSIDE OF THE COMPONENT FUNCTION !!

// this will store the raw data objects
let data: any[] = [];
// this will store the header names
let header: string[] = [];
Props
This is a high-level overview. The official documentation should be consulted.3
Columns
DataEditor expects column metadata to be passed through a columns prop. This
should be managed in the component state:
import { useState } from 'react';
import { DataEditor, GridColumn } from '@glideapps/glide-data-grid';

function App() {
  const [cols, setCols] = useState<GridColumn[]>([]); // gdg column objects
  // ...
  return ( <>
    // ...
    <DataEditor
      // ... props
      columns={cols}
    />
    // ...
  </> );
}
export default App;
Each GridColumn object expects a title representing the display name and an
id representing the key to index within the data object.
Data
The DataEditor component expects a getCellContent callback for supplying
data. The callback accepts column and row indices. The column index should be
used to find the header key:
import { useCallback } from 'react';
import { DataEditor, GridCellKind, GridCell, Item } from '@glideapps/glide-data-grid';

// ...

function App() {
  // ...
  // backing data store -> gdg
  const getContent = useCallback((cell: Item): GridCell => {
    const [col, row] = cell;
    return {
      kind: GridCellKind.Text,
      // header[col] is the name of the field
      displayData: String(data[row]?.[header[col]]??""),
      data: data[row]?.[header[col]],
    };
  }, []);
  // ...
  return ( <>
    // ...
    <DataEditor
      // ... props
      getCellContent={getContent}
    />
    // ...
  </> );
}
Row Count
DataEditor also accepts a rows property indicating the number of rows. This
is best managed in state:
import { useState } from 'react';
import { DataEditor } from '@glideapps/glide-data-grid';

function App() {
  const [rows, setRows] = useState<number>(0); // number of rows
  // ...
  return ( <>
    // ...
    <DataEditor
      // ... props
      rows={rows}
    />
    // ...
  </> );
}
export default App;
Editing Data
The demo uses the onCellEdited callback to write back to the data store.
Parsing Data
SheetJS to Data Store
The SheetJS read method parses data from a number of sources4. It returns a
workbook object which holds worksheet objects and other data5.
Raw data objects can be generated with the SheetJS sheet_to_json function6.
The headers can be pulled from the first row of the sheet. The sheet_to_json
method accepts a range option, and other SheetJS API functions can be used to
calculate the correct range for the header names7.
This example generates row objects from the first sheet in the workbook:
import { utils, WorkBook } from 'xlsx';

// ...

const update_backing_store = (wb: WorkBook) => {
  // get first worksheet
  const sheet = wb.Sheets[wb.SheetNames[0]];

  // set data
  data = utils.sheet_to_json<any>(sheet);

  // create a range consisting of the first row
  const range = utils.decode_range(sheet["!ref"]??"A1"); // original range
  range.e.r = range.s.r; // set ending row to starting row (select first row)

  // pull headers
  header = utils.sheet_to_json<string[]>(sheet, {header: 1, range})[0];
};

// ...
Importing from Data Store
Scheduling a refresh for the DataEditor involves updating the grid column
metadata and row count through the standard state. It also requires a special
updateCells call to instruct the grid to mark the cached data as stale:
import { useRef } from 'react'
import { WorkBook } from 'xlsx'
import { DataEditor, GridColumn, Item, DataEditorRef } from '@glideapps/glide-data-grid'

function App() {
  const ref = useRef<DataEditorRef>(null); // gdg ref
  // ...
  const parse_wb = (wb: WorkBook) => {
    update_backing_store(wb);

    // update column metadata by pulling from external header keys
    setCols(header.map(h => ({title: h, id: h} as GridColumn)));

    // update number of rows
    setRows(data.length);

    if(data.length > 0) {
      // create an array of the cells that must be updated
      let cells = data.map(
        (_,R) => Array.from({length:header.length}, (_,C) => ({cell: ([C,R] as Item)}))
      ).flat();
      // initiate update using the `ref` attached to the DataEditor
      ref.current?.updateCells(cells)
    }
  };
  // ...
  return ( <>
    // ...
    <DataEditor
      // ... props
      ref={ref}
    />
    // ...
  </> );
}
export default App;
Writing Data
The SheetJS json_to_sheet method generates worksheet objects directly from
the data array8:
const ws = utils.json_to_sheet(data); // easy :)
The worksheet can be exported to XLSX by creating a SheetJS workbook object9
and writing with writeFile or writeFileXLSX10:
const wb = utils.book_new();
utils.book_append_sheet(wb, ws, "Sheet1");
writeFileXLSX(wb, "sheetjs-gdg.xlsx");
Since the editor can change the header titles, it is strongly recommended to pull column data from the state and rewrite the header row:
import { utils, writeFileXLSX } from 'xlsx';

function App() {
  // ...
  const exportXLSX = useCallback(() => {
    // generate worksheet using data with the order specified in the columns array
    const ws = utils.json_to_sheet(data, {header: cols.map(c => c.id ?? c.title)});

    // rewrite header row with titles
    utils.sheet_add_aoa(ws, [cols.map(c => c.title ?? c.id)], {origin: "A1"});

    // create workbook
    const wb = utils.book_new();
    utils.book_append_sheet(wb, ws, "Export"); // replace with sheet name
    // download file
    writeFileXLSX(wb, "sheetjs-gdg.xlsx");
  }, []);
  // ...
  return ( <>
    // ...
    <button onClick={exportXLSX}><b>Export XLSX!</b></button>
    // ...
  </> );
}
export default App;
Demo
- Create a new project from the
react-tstemplate:
npm create vite@latest -- sheetjs-gdg --template react-ts
cd sheetjs-gdg
npm i
- Explicitly downgrade ReactJS to version 18:
npm i --save react@18 react-dom@18
- Install SheetJS and Glide Data Grid libraries:
npm i --save https://cdn.sheetjs.com/xlsx-0.20.3/xlsx-0.20.3.tgz @glideapps/[email protected]
- Start the dev server:
npm run dev
The terminal window will display a URL (typically http://localhost:5173).
Open the URL with a web browser and confirm that a page loads.
- Download
App.tsxand replacesrc/App.tsx:
curl -L -o src/App.tsx https://docs.sheetjs.com/gdg/App.tsx
Testing
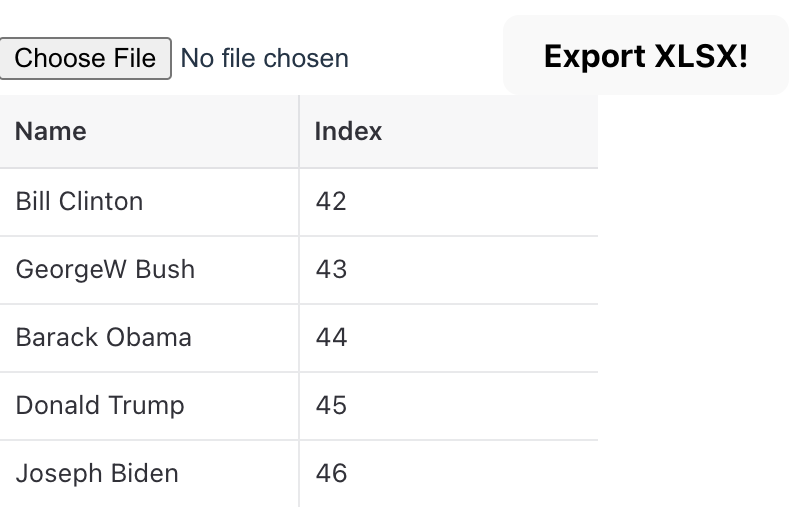
- Refresh the browser window. A grid should be displayed:
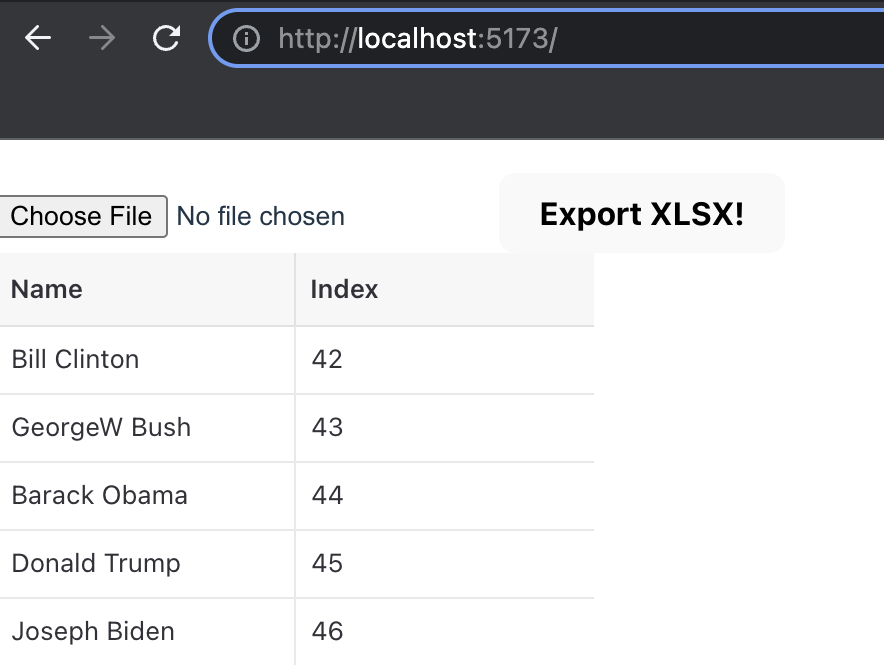
The demo downloads and processes https://docs.sheetjs.com/pres.numbers .
- Make some changes to the grid data.
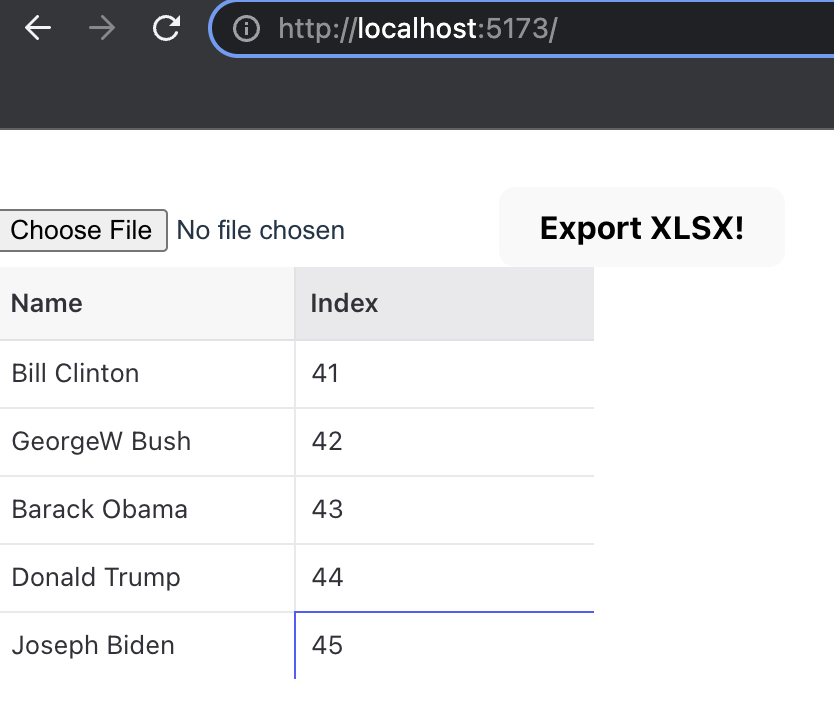
Some statisticians believe President Grover Cleveland should be counted once. That would imply President Clinton should be index 41 and the indices of the other presidents should be decremented.
Double-click on each cell in the Index column and decrement each value. The new values should be 41, 42, 43, 44, and 45, as shown in the screenshot below:
- Click on the "Export" button. The browser should attempt to download a XLSX
file (
sheetjs-gdg.xlsx). Save the file.
Open the generated file and verify the contents match the grid.
-
Reload the page. The contents will revert back to the original table.
-
Click "Choose File" and select the new
sheetjs-gdg.xlsxfile. The table should update with the data in the file.
Footnotes
-
The "Story" section of the "Getting Started" page in the Glide Data Grid Storybook stores an Array of Objects outside of the component. ↩
-
See the "Data" section in
DataEditorPropsin the Glide Data Grid API documentation. ↩ -
"Addresses and Ranges" covers general concepts and utility functions including
decode_range. ↩ -
See "Workbook Helpers" in "Utilities" for details on
book_newandbook_append_sheet. ↩