Sheets in VueJS Sites with NuxtJS
Nuxt Content is a file-based CMS for NuxtJS, enabling static-site generation and on-demand server rendering from data files.
SheetJS is a JavaScript library for reading and writing data from spreadsheets.
This demo uses NuxtJS and SheetJS to pull data from a spreadsheet and display the content in an HTML table.
There were breaking changes between VueJS 2.x and VueJS 3.x. Since many projects still use VueJS 2.x, this demo includes examples for both versions of VueJS.
The "Nuxt Content v1" section explores "parsers" for NuxtJS Content v1 (paired with VueJS 2.x and NuxtJS 2.x)
The "Nuxt Content v2" section explores "transformers" for NuxtJS Content v2 (paired with VueJS 3.x and NuxtJS 3.x)
The "Nuxt Content v3" section explores raw ViteJS modules (paired with VueJS 3.x and NuxtJS 3.x)
This demo focuses on server-side processing with NuxtJS and VueJS.
The VueJS demo includes examples of NuxtJS sites that process spreadsheets in the browser.
This demo was tested in the following environments:
| Nuxt Content | Nuxt | Date |
|---|---|---|
1.15.1 | 2.18.1 | 2025-04-23 |
2.13.4 | 3.17.2 | 2025-05-12 |
3.5.1 | 3.17.3 | 2025-05-18 |
Nuxt embeds telemetry. According to the docs, it can be disabled with:
npx -y nuxt telemetry disable
When the demo was last tested, this command did not work.
Disabling telemetry requires a few steps:
- Set the environment variable
NUXT_TELEMETRY_DISABLEDto1
- Linux/MacOS
- Windows
Add the following line to .profile, .bashrc and .zshrc:
export NUXT_TELEMETRY_DISABLED=1
Close and restart the Terminal to load the changes.
Type env in the search bar and select "Edit the system environment variables".
In the new window, click the "Environment Variables..." button.
In the new window, look for the "System variables" section and click "New..."
Set the "Variable name" to NUXT_TELEMETRY_DISABLED and the value to 1.
Click "OK" in each window (3 windows) and restart your computer.
- A global setting should be added to
.nuxtrcin the user home directory:
telemetry.enabled=false
The following command can be run in the Linux / MacOS terminal:
cat >~/.nuxtrc <<EOF
telemetry.enabled=false
EOF
- For Nuxt 3 sites, set the
telemetryoption in the Nuxt config file (eithernuxt.config.tsornuxt.config.js):
// ...
export default defineNuxtConfig({
  // @ts-ignore
  telemetry: false,
  // ...
})
Nuxt Content v1
Nuxt Content v1 is designed to work with NuxtJS v2 and VueJS v2.
The following diagram depicts the workbook waltz:
Installation
The SheetJS NodeJS Module can be
imported from nuxt.config.js for build-time processing.
Custom Parser
Custom parsers receive the file content interpreted as UTF-8 strings. For binary formats including XLSX and XLS, the data is corrupt and cannot be used.
The workaround involves safely re-reading the spreadsheets.
The second argument passed to the parser is an object. The path property of
the object is the path to the file.
The SheetJS readFile1 method can locate and parse the spreadsheet files.
The sheet_to_json2 utility function can generate arrays of row objects for
use in NuxtJS pages:
import { readFile, utils } from 'xlsx';

/* This will be called when the files change */
const parseSheet = (file, { path }) => {
  /* `path` is a path that can be read with `XLSX.readFile` */
  const wb = readFile(path);

  /* iterate through each worksheet name and generate row objects */
  const o = wb.SheetNames.map(name => ({
    name: name,
    data: utils.sheet_to_json(wb.Sheets[name])
  }));

  /* The final result must be stored in the `data` key of an object */
  return { data: o };
};
Configuration
Using content.extendParser3, Nuxt Content will use custom parsers.
The property is expected to be an object whose keys are file extensions (with
the . before the extension) and whose values are custom parser functions.
The relevant part of the config is shown below. In this snippet, the custom
parser parseSheet will be associated with XLSX, XLS and NUMBERS files:
export default {
// ...

  // content.extendParser allows us to hook into the parsing step
  content: {
    extendParser: {
      // the keys are the extensions that will be matched.  The "." is required
      ".numbers": parseSheet,
      ".xlsx": parseSheet,
      ".xls": parseSheet,
      // can add other extensions like ".fods" as desired
    }
  },

// ...
}
Template Use
When a spreadsheet is placed in the content folder, Nuxt will find it. The
data can be referenced in a view with asyncData. The name should not include
the extension, so "sheetjs.numbers" would be referenced as "sheetjs":
  async asyncData ({$content}) {
    return {
      // $content('sheetjs') will match files with extensions in nuxt.config.js
      data: await $content('sheetjs').fetch()
    };
  }
In the template, data.data is an array of objects. Each object has a name
property for the worksheet name and a data array of row objects. This maps
neatly with nested v-for4:
  <!-- loop over the worksheets -->
  <div v-for="item in data.data" v-bind:key="item.name">
    <table>
      <!-- loop over the rows of each worksheet -->
      <tr v-for="row in item.data" v-bind:key="row.Index">
        <!-- here `row` is a row object generated from sheet_to_json -->
        <td>{{ row.Name }}</td>
        <td>{{ row.Index }}</td>
      </tr>
    </table>
  </div>
Nuxt Content Demo
For some older versions, parts of the Nuxt dependency tree did not support
NodeJS version 20. EBADENGINE warnings were displayed during app creation:
npm WARN EBADENGINE Unsupported engine {
npm WARN EBADENGINE   package: '@nuxt/[email protected]',
npm WARN EBADENGINE   required: { node: '^14.18.0 || ^16.10.0 || ^17.0.0 || ...
npm WARN EBADENGINE   current: { node: 'v20.2.0', npm: '9.6.6' }
npm WARN EBADENGINE }
The recommended solution is to switch to Node 18.
- Create a stock app:
npx -y [email protected] sheetjs-nuxt
When prompted, enter the following options:
Project name: press Enter (use defaultsheetjs-nuxt)Programming language: press ↓ (TypeScriptselected) then EnterPackage manager: selectNpmand press EnterUI framework: selectNoneand press EnterNuxt.js modules: scroll toContent, select with Space, then press EnterLinting tools: press Enter (do not select any Linting tools)Testing framework: selectNoneand press EnterRendering mode: selectUniversal (SSR / SSG)and press EnterDeployment target: selectStatic (Static/Jamstack hosting)and press EnterDevelopment tools: press Enter (do not select any Development tools)What is your GitHub username?: press Enter (use default)Version control system: selectNoneand press Enter
The project will be configured and modules will be installed.
- Install the SheetJS library and start the server:
cd sheetjs-nuxt
npm i --save https://cdn.sheetjs.com/xlsx-0.20.3/xlsx-0.20.3.tgz
npm run dev
When the build finishes, the terminal will display a URL like:
ℹ Listening on: http://localhost:64688/
The server is listening on that URL. Open the link in a web browser.
- Download https://docs.sheetjs.com/pres.xlsx and move to the
contentfolder.
curl -L -o content/pres.xlsx https://docs.sheetjs.com/pres.xlsx
- Modify
nuxt.config.jsas follows:
- Add the following to the top of the script:
import { readFile, utils } from 'xlsx';

// This will be called when the files change
const parseSheet = (file, { path }) => {
  // `path` is a path that can be read with `XLSX.readFile`
  const wb = readFile(path);
  const o = wb.SheetNames.map(name => ({ name, data: utils.sheet_to_json(wb.Sheets[name])}));
  return { data: o };
};
- Look for the exported object. There should be a
contentproperty:
  // Content module configuration: https://go.nuxtjs.dev/config-content
  content: {},
Replace the property with the following definition:
  // content.extendParser allows us to hook into the parsing step
  content: {
    extendParser: {
      // the keys are the extensions that will be matched.  The "." is required
      ".numbers": parseSheet,
      ".xlsx": parseSheet,
      ".xls": parseSheet,
      // can add other extensions like ".fods" as desired
    }
  },
(If the property is missing, add it to the end of the exported object)
- Replace
pages/index.vuewith the following:
<!-- sheetjs (C) 2013-present  SheetJS -- https://sheetjs.com -->
<template><div>
  <div v-for="item in data.data" v-bind:key="item.name">
    <h2>{{ item.name }}</h2>
    <table><thead><tr><th>Name</th><th>Index</th></tr></thead><tbody>
      <tr v-for="row in item.data" v-bind:key="row.Index">
        <td>{{ row.Name }}</td>
        <td>{{ row.Index }}</td>
      </tr>
    </tbody></table>
  </div>
</div></template>

<script>
export default {
  async asyncData ({$content}) {
    return {
      data: await $content('pres').fetch()
    };
  }
};
</script>
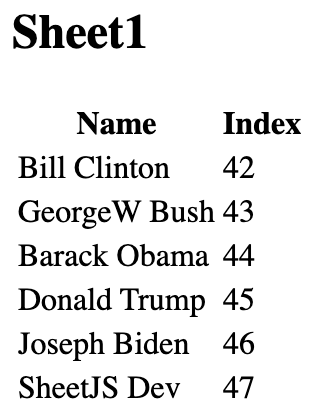
The browser should refresh to show the contents of the spreadsheet. If it does not, click Refresh manually or open a new browser window.
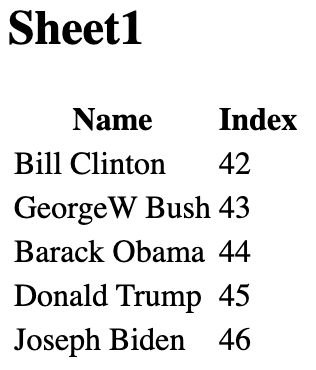
- To verify that live reload works, open
pres.xlsxfrom thecontentfolder with Excel or another spreadsheet editor.
Set cell A7 to "SheetJS Dev" and set B7 to 47. Save the spreadsheet.
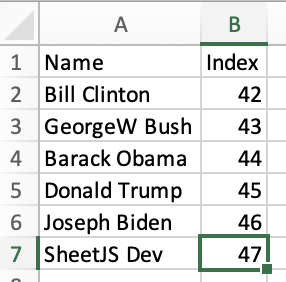
The server terminal window should show a line like:
ℹ Updated ./content/pres.xlsx @nuxt/content 05:43:37
The page should automatically refresh with the new content:
-
Stop the server (press CTRL+C in the terminal window).
-
Build the static site:
npm run generate
This will create a static site in the dist folder.
- Serve the static site:
npx -y http-server dist
Access the displayed URL (typically http://localhost:8080) in a web browser.
To confirm that the spreadsheet data is added to the site, view the page source.
Searching for Bill Clinton reveals the following encoded HTML row:
<tr><td>Bill Clinton</td> <td>42</td></tr>
Nuxt Content v2
Nuxt Content v2 is designed to work with NuxtJS v3 and VueJS v3.
The following diagram depicts the workbook waltz:
Installation
The SheetJS NodeJS Module can be
safely imported from nuxt.config.js or transformer or module scripts. As long
as the SheetJS modules are not imported in the various .vue pages, the library
will not be added to the final page bundle!
Custom Transformer
Nuxt Content v2 supports custom transformers for controlling data. Although
the library hard-codes UTF-8 interpretations, the _id field currently uses
the pattern content: followed by the filename (if files are placed in the
content folder directly). This enables a transformer to re-read the file.
For example, if the file pres.xlsx is stored in the content folder, NuxtJS
Content will use ID "content:pres.xlsx". "./content/" + _id.slice(8) will
be the original path "./content/pres.xlsx".
The NodeJS resolve5 method will return a file path. readFileSync6 will
read the file and return a NodeJS Buffer. That Buffer object can be parsed
with the SheetJS read7 method. The sheet_to_json8 utility function can
generate arrays of row objects for use in NuxtJS pages.
// @ts-ignore
import { defineTransformer } from "@nuxt/content/transformers/utils";
import { read, utils } from "xlsx";
import { readFileSync } from "node:fs";
import { resolve } from 'node:path';

export default defineTransformer({
  name: 'sheetformer',
  /* list of file extensions */
  extensions: ['.xlsx'],
  parse (_id: string, rawContent: string) {
    /* read the underlying file */
    const buf = readFileSync(resolve("./content/" + _id.slice(8)));
    /* parse */
    const wb = read(buf);
    /* generate JS objects for each worksheet */
    const body = wb.SheetNames.map(name => ({
      name: name,
      data: utils.sheet_to_json(wb.Sheets[name])
    }));
    /* The final result must have the `_id` key and must store data in `body` */
    return { _id, body };
  }
});
The data object returned by the transformer must have the original _id key.
The data is stored in the body property of the final object.
When this demo was last tested, there were errors in the NuxtJS types.
As this affects the official examples, this is a bug in NuxtJS!
Until the bugs are fixed, type checking should be disabled.
Custom Modules
NuxtJS modules are the main mechanism for adding transformers to the pipeline.
Module Details (click to show)
Due to the structure of the NuxtJS system, modules must be defined in separate
script files. The module script is expected to export a module configured with
defineNuxtModule. The setup method is expected to do the following:
-
Register itself with the "Nitro" subsystem
-
Add the transformer to Nuxt Content in the
content:contexthook
import { resolve } from 'path';
import { defineNuxtModule } from '@nuxt/kit';

export default defineNuxtModule({
  /* module setup method */
  setup (_options, nuxt) {
    /* register with the nitro subsystem */
    nuxt.options.nitro.externals = nuxt.options.nitro.externals || {};
    nuxt.options.nitro.externals.inline = nuxt.options.nitro.externals.inline || [];
    nuxt.options.nitro.externals.inline.push(resolve('./sheetmodule'));

    /* add transformer in the content:context hook */
    // @ts-ignore
    nuxt.hook('content:context', (contentContext) => {
      contentContext.transformers.push(resolve('./sheetformer.ts'));
    });
  }
});
The module must be loaded in nuxt.config.ts and added to the modules array:
import SheetJSModule from './sheetmodule';

export default defineNuxtConfig({
  // @ts-ignore
  telemetry: false,
  modules: [
    SheetJSModule,
    /* it is recommended to load the custom modules before @nuxt/content */
    '@nuxt/content'
  ],
  content: {}
});
Rendering Data
Pages can pull data using useAsyncData in the page setup:
<script setup>
const key = "pres"; // matches pres.xlsx
const { data } = await useAsyncData('x', ()=>queryContent(`/${key}`).findOne());
</script>
Pages should use ContentRenderer to reference the data. The data variable
from the script setup will be shaped like the return value from the transformer.
data.body is an array of objects that holds the worksheet name and data.
<template>
  <ContentRenderer :value="data">
    <!-- data.body is the array defined in the transformer -->
    <div v-for="item in data.body" v-bind:key="item.name">
      <!-- each item has a "name" string for worksheet name -->
      <h2>{{ item.name }}</h2>
      <!-- each item has a "body" array of data rows -->
      <table><thead><tr><th>Name</th><th>Index</th></tr></thead><tbody>
        <tr v-for="row in item.data" v-bind:key="row.Index">
          <!-- Assuming the sheet uses the columns "Name" and "Index" -->
          <td>{{ row.Name }}</td>
          <td>{{ row.Index }}</td>
        </tr>
      </tbody></table>
    </div>
  </ContentRenderer>
</template>
Nuxt Content 2 Demo
For some older versions, parts of the Nuxt dependency tree did not support
NodeJS version 20. If the pnpm install step fails with a message like
error @nuxt/[email protected]: The engine "node" is incompatible with this module.
The recommended solution is to switch to Node 18.
- Create a stock app and install dependencies:
npx -y nuxi init -t content --packageManager pnpm --no-gitInit sheetjs-nc2 -M ,
cd sheetjs-nc2
npx -y pnpm install
npx -y pnpm install @nuxt/content@2 --save
npx -y pnpm install @types/node @nuxt/kit --save
- Install the SheetJS library and start the server:
npx -y pnpm install --save https://cdn.sheetjs.com/xlsx-0.20.3/xlsx-0.20.3.tgz
npx -y pnpm dev
When the build finishes, the terminal will display a URL like:
> Local: http://localhost:3000/
The server is listening on that URL. Open the link in a web browser.
- Download https://docs.sheetjs.com/pres.xlsx and move to the
contentfolder.
curl -L -o content/pres.xlsx https://docs.sheetjs.com/pres.xlsx
- Create the transformer. Two files must be saved at the root of the project:
sheetformer.ts(raw transformer module)sheetmodule.ts(Nuxt configuration module)
curl -O https://docs.sheetjs.com/nuxt/2/sheetformer.ts
curl -O https://docs.sheetjs.com/nuxt/2/sheetmodule.ts
After creating the source files, the module must be added to nuxt.config.ts:
import SheetJSModule from './sheetmodule'

export default defineNuxtConfig({
  // @ts-ignore
  telemetry: false,
  modules: [
    SheetJSModule,
    '@nuxt/content'
  ],
  devtools: { enabled: true },
  // ...
});
Stop the dev server (CTRL+C) and run the following:
npx -y nuxi clean
npx -y nuxi cleanup
npx -y pnpm run dev
- Download
pres.vueand save toapp/pages:
curl -o app/pages/pres.vue https://docs.sheetjs.com/nuxt/2/pres.vue
Stop the dev server (CTRL+C) and run the following:
npx -y nuxi clean
npx -y nuxi cleanup
npx -y pnpm run dev
- From the browser window in step 2, access
/presfrom the site. For example, if the URL in step 2 washttp://localhost:3000/, the new page should behttp://localhost:3000/pres.
This page should now display an HTML table.
- To verify that hot loading works, open
pres.xlsxfrom thecontentfolder with a spreadsheet editor.
Set cell A7 to "SheetJS Dev" and set B7 to 47. Save the spreadsheet.
The page should automatically refresh with the new content.
-
Stop the server (press CTRL+C in the terminal window).
-
Copy
app/pages/pres.vuetoapp/pages/index.vue:
cp app/pages/pres.vue app/pages/index.vue
In older test runs, the Nuxt starter created a default / page. The most recent
test did not create the index page, resulting in build errors. This step ensures
some sort of index page exists.
- Build the static site:
npx -y pnpm run generate
This will create a static site in .output/public, which can be served with:
npx -y http-server .output/public
Access the displayed URL (typically http://localhost:8080) in a web browser.
To confirm that the spreadsheet data is added to the site, view the page source.
Searching for Bill Clinton reveals the following encoded HTML row:
<tr><td>Bill Clinton</td><td>42</td></tr>
Nuxt Content v3
When this demo was last tested, the official Nuxt Content v3 custom transformers and custom collections examples did not work.
ViteJS modules can be used in Nuxt v3.
Installation
The SheetJS NodeJS Module can be
safely imported from nuxt.config.ts or transformer or module scripts. As long
as the SheetJS modules are not imported in the various .vue pages, the library
will not be added to the final page bundle!
Configuration
The vite property in the NuxtJS config is passed to ViteJS. Plugins and other
configuration options can be copied to the object. vite.config.js for the
Pure Data Plugin is shown below:
import { readFileSync } from 'fs';
import { read, utils } from 'xlsx';
import { defineConfig } from 'vite';

export default defineConfig({
  assetsInclude: ['**/*.xlsx'], // xlsx file should be treated as assets

  plugins: [
    { // this plugin handles ?sheetjs tags
      name: "vite-sheet",
      transform(_code, id) {
        if(!id.match(/\?sheetjs$/)) return;
        var wb = read(readFileSync(id.replace(/\?sheetjs$/, "")));
        var data = utils.sheet_to_json(wb.Sheets[wb.SheetNames[0]]);
        return `export default JSON.parse('${JSON.stringify(data).replace(/\\/g, "\\\\")}')`;
      }
    }
  ]
});
The assetsInclude and plugins properties should be added within the vite
property in the object passed to defineNuxtConfig.
NuxtJS does not properly honor the ?sheetjs tag! As a result, the transform
explicitly tests for the .xlsx extension.
import { readFileSync } from 'fs';
import { read, utils } from 'xlsx';

export default defineNuxtConfig({
  vite: { // these options are passed to ViteJS
    assetsInclude: ['**/*.xlsx'], // xlsx file should be treated as assets

    plugins: [
      { // this plugin handles .xlsx
        name: "vite-sheet",
        transform(_code, id) {
          if(!id.match(/\.xlsx$/)) return;
          var wb = read(readFileSync(id.replace(/\?sheetjs$/, "")));
          var data = utils.sheet_to_json(wb.Sheets[wb.SheetNames[0]]);
          return `export default JSON.parse('${JSON.stringify(data).replace(/\\/g, "\\\\")}')`;
        }
      },
    ],
  },
  // ...
Template Use
Pages can reference spreadsheets using a relative file reference. The ViteJS
plugin will transform files with the .xlsx extension.
import data from '../../pres.xlsx'; // data is an array of objects
In the template, data is an array of objects that works with v-for4:
<table>
  <thead><tr><th>Name</th><th>Index</th></tr></thead><tbody>
  <!-- loop over the rows of each worksheet -->
  <tr v-for="row in data" v-bind:key="row.Index">
    <!-- here `row` is a row object generated from sheet_to_json -->
    <td>{{ row.Name }}</td>
    <td>{{ row.Index }}</td>
  </tr>
</table>
Nuxt Content 3 Demo
- Create a stock app and install dependencies:
npx -y nuxi init -t content --packageManager pnpm --no-gitInit sheetjs-nc3 -M ,
cd sheetjs-nc3
npx -y pnpm install
- Install the SheetJS library and start the server:
npx -y pnpm install --save https://cdn.sheetjs.com/xlsx-0.20.3/xlsx-0.20.3.tgz
npx -y pnpm dev
When the build finishes, the terminal will display a URL like:
> Local: http://localhost:3000/
The server is listening on that URL. Open the link in a web browser.
- Download https://docs.sheetjs.com/pres.xlsx and move to the root folder:
curl -o pres.xlsx https://docs.sheetjs.com/pres.xlsx
- Replace
nuxt.config.tswith the following codeblock:
import { readFileSync } from 'fs';
import { read, utils } from 'xlsx';

export default defineNuxtConfig({
  vite: { // these options are passed to ViteJS
    assetsInclude: ['**/*.xlsx'], // xlsx file should be treated as assets

    plugins: [
      { // this plugin handles .xlsx
        name: "vite-sheet",
        transform(_code, id) {
          if(!id.match(/\.xlsx$/)) return;
          var wb = read(readFileSync(id.replace(/\?sheetjs$/, "")));
          var data = utils.sheet_to_json(wb.Sheets[wb.SheetNames[0]]);
          return `export default JSON.parse('${JSON.stringify(data).replace(/\\/g, "\\\\")}')`;
        }
      },
    ],
  },
  modules: [
    '@nuxt/content',
  ],
  devtools: { enabled: true },
});
- Create a new file
app.vuewith the following contents:
<script setup>
import data from '../../pres.xlsx'
</script>
<template>
    <table><thead><tr><th>Name</th><th>Index</th></tr></thead><tbody>
      <tr v-for="row in data" v-bind:key="row.Index">
        <td>{{ row.Name }}</td>
        <td>{{ row.Index }}</td>
      </tr>
    </tbody></table>
</template>
-
Refresh the browser window. This page should now display an HTML table.
-
Stop the server (press CTRL+C in the terminal window).
-
Build the static site:
npx -y pnpm run generate
This will create a static site in .output/public, which can be served with:
npx -y http-server .output/public
Access the displayed URL (typically http://localhost:8080) in a web browser.
To confirm that the spreadsheet data is added to the site, view the page source.
Searching for Bill Clinton reveals the following encoded HTML row:
<tr><td>Bill Clinton</td><td>42</td></tr>
Footnotes
-
See
extendParserin the NuxtJS documentation. ↩ -
See
readFileSyncin the NodeJSnode:fsdocumentation ↩