Sheets in Svelte Sites
Svelte is a JavaScript library for building user interfaces.
SheetJS is a JavaScript library for reading and writing data from spreadsheets.
This demo uses Svelte and SheetJS to process and generate spreadsheets. We'll explore how to load SheetJS in a Svelte component and compare common state models and data flow strategies.
This demo focuses on Svelte concepts. Other demos cover general deployments:
Installation
The "Frameworks" section covers installation with Yarn and other package managers.
The library can be imported directly from Svelte files with:
import { read, utils, writeFile } from 'xlsx';
Internal State
The various SheetJS APIs work with various data shapes. The preferred state depends on the application.
Array of Objects
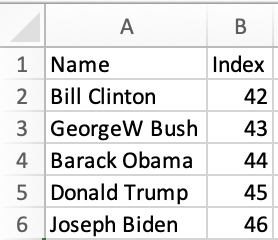
Typically, some users will create a spreadsheet with source data that should be
loaded into the site. This sheet will have known columns. For example, "Name"
and "Index" are used in pres.xlsx:
| Spreadsheet | State |
|---|---|
| |
This naturally maps to an array of typed objects, as in the TS example below:
import { read, utils } from 'xlsx';

interface President {
  Name: string;
  Index: number;
}

const f = await (await fetch("https://docs.sheetjs.com/pres.xlsx")).arrayBuffer();
const wb = read(f);
const data = utils.sheet_to_json<President>(wb.Sheets[wb.SheetNames[0]]);
console.log(data);
A component will typically map over the data. The following example generates a TABLE with a row for each President:
<script>
import { onMount } from 'svelte';
import { read, utils, writeFileXLSX } from 'xlsx';

/* the component state is an array of presidents */
let pres = [];

/* Fetch and update the state once */
onMount(async() => {
  const f = await (await fetch("https://docs.sheetjs.com/pres.xlsx")).arrayBuffer();
  const wb = read(f); // parse the array buffer
  const ws = wb.Sheets[wb.SheetNames[0]]; // get the first worksheet
  pres = utils.sheet_to_json(ws); // generate objects and update state
});

/* get state data and export to XLSX */
function exportFile() {
  const ws = utils.json_to_sheet(pres);
  const wb = utils.book_new();
  utils.book_append_sheet(wb, ws, "Data");
  writeFileXLSX(wb, "SheetJSSvelteAoO.xlsx");
}
</script>

<main>
  <table><thead><tr><th>Name</th><th>Index</th></tr></thead><tbody>
  {#each pres as p}<tr>
    <td>{p.Name}</td>
    <td>{p.Index}</td>
  </tr>{/each}
  </tbody><tfoot><tr><td colSpan={2}>
  <button on:click={exportFile}>Export XLSX</button>
  </td></tr></tfoot></table>
</main>
How to run the example (click to hide)
This demo was tested in the following environments:
| SvelteJS | ViteJS | Date |
|---|---|---|
5.38.6 | 7.1.1 | 2025-09-03 |
- Create a new project:
npm create vite@latest sheetjs-svelte -- --template svelte-ts
- Install the SheetJS dependency and start the dev server:
cd sheetjs-svelte
npm i
npm i --save https://cdn.sheetjs.com/xlsx-0.20.3/xlsx-0.20.3.tgz
npm run dev
-
Open a web browser and access the displayed URL (
http://localhost:5173) -
Replace
src/App.sveltewith thesrc/SheetJSSvelteAoO.svelteexample.
The page will refresh and show a table with an Export button. Click the button
and the page will attempt to download SheetJSSvelteAoA.xlsx. There may be a
delay since Vite will try to optimize the SheetJS library on the fly.
-
Stop the server (press CTRL+C in the terminal window).
-
Build the site:
npm run build
The generated site will be placed in the dist folder.
- Start a local web server:
npx -y http-server dist
Access the displayed URL (typically http://localhost:8080) with a web browser
and test the page.
HTML
The main disadvantage of the Array of Objects approach is the specific nature of the columns. For more general use, passing around an Array of Arrays works. However, this does not handle merge cells1 well!
The sheet_to_html function generates HTML that is aware of merges and other
worksheet features. Svelte @html tag allows raw HTML strings:
<script>
import { onMount } from 'svelte';
import { read, utils, writeFileXLSX } from 'xlsx';

let html = "";
let tbl;

/* Fetch and update the state once */
onMount(async() => {
  const f = await (await fetch("https://docs.sheetjs.com/pres.xlsx")).arrayBuffer();
  const wb = read(f); // parse the array buffer
  const ws = wb.Sheets[wb.SheetNames[0]]; // get the first worksheet
  html = utils.sheet_to_html(ws); // generate HTML and update state
});

/* get state data and export to XLSX */
function exportFile() {
  const elt = tbl.getElementsByTagName("TABLE")[0];
  const wb = utils.table_to_book(elt);
  writeFileXLSX(wb, "SheetJSSvelteHTML.xlsx");
}
</script>

<main>
  <button on:click={exportFile}>Export XLSX</button>
  <div bind:this={tbl}>{@html html}</div>
</main>
How to run the example (click to hide)
This demo was tested in the following environments:
| SvelteJS | ViteJS | Date |
|---|---|---|
5.25.3 | 6.2.3 | 2025-03-30 |
- Create a new project:
npm create vite@latest sheetjs-svelte -- --template svelte-ts
- Install the SheetJS dependency and start the dev server:
cd sheetjs-svelte
npm i
npm i --save https://cdn.sheetjs.com/xlsx-0.20.3/xlsx-0.20.3.tgz
npm run dev
-
Open a web browser and access the displayed URL (
http://localhost:5173) -
Replace
src/App.sveltewith thesrc/SheetJSSvelteHTML.svelteexample.
The page will refresh and show a table with an Export button. Click the button
and the page will attempt to download SheetJSSvelteHTML.xlsx. There may be a
delay since Vite will try to optimize the SheetJS library on the fly.
-
Stop the server (press CTRL+C in the terminal window).
-
Build the site:
npm run build
The generated site will be placed in the dist folder.
- Start a local web server:
npx -y http-server dist
Access the displayed URL (typically http://localhost:8080) with a web browser
and test the page.
Footnotes
-
See "Merged Cells" in "SheetJS Data Model" for more details. ↩
