Native Sheets in NativeScript
NativeScript is a mobile app framework. It builds iOS and Android apps that use JavaScript for describing layouts and events.
SheetJS is a JavaScript library for reading and writing data from spreadsheets.
This demo uses NativeScript and SheetJS to process and generate spreadsheets. We'll explore how to load SheetJS in a NativeScript app; parse and generate spreadsheets stored on the device; and fetch and parse remote files.
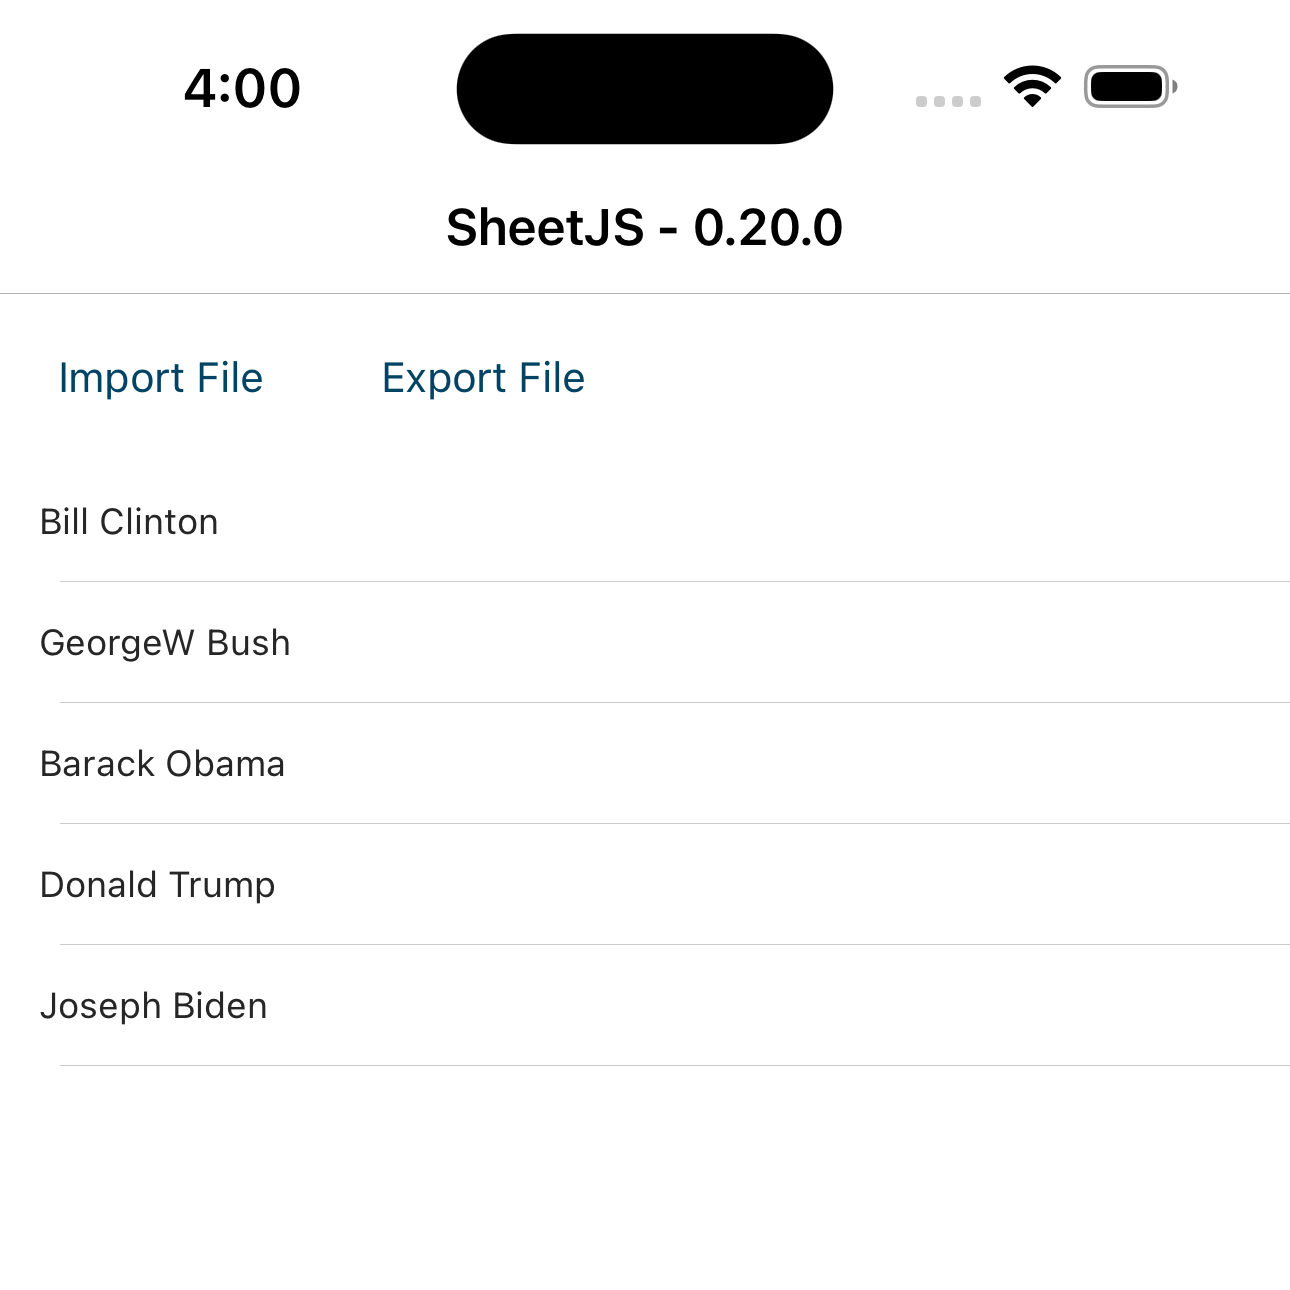
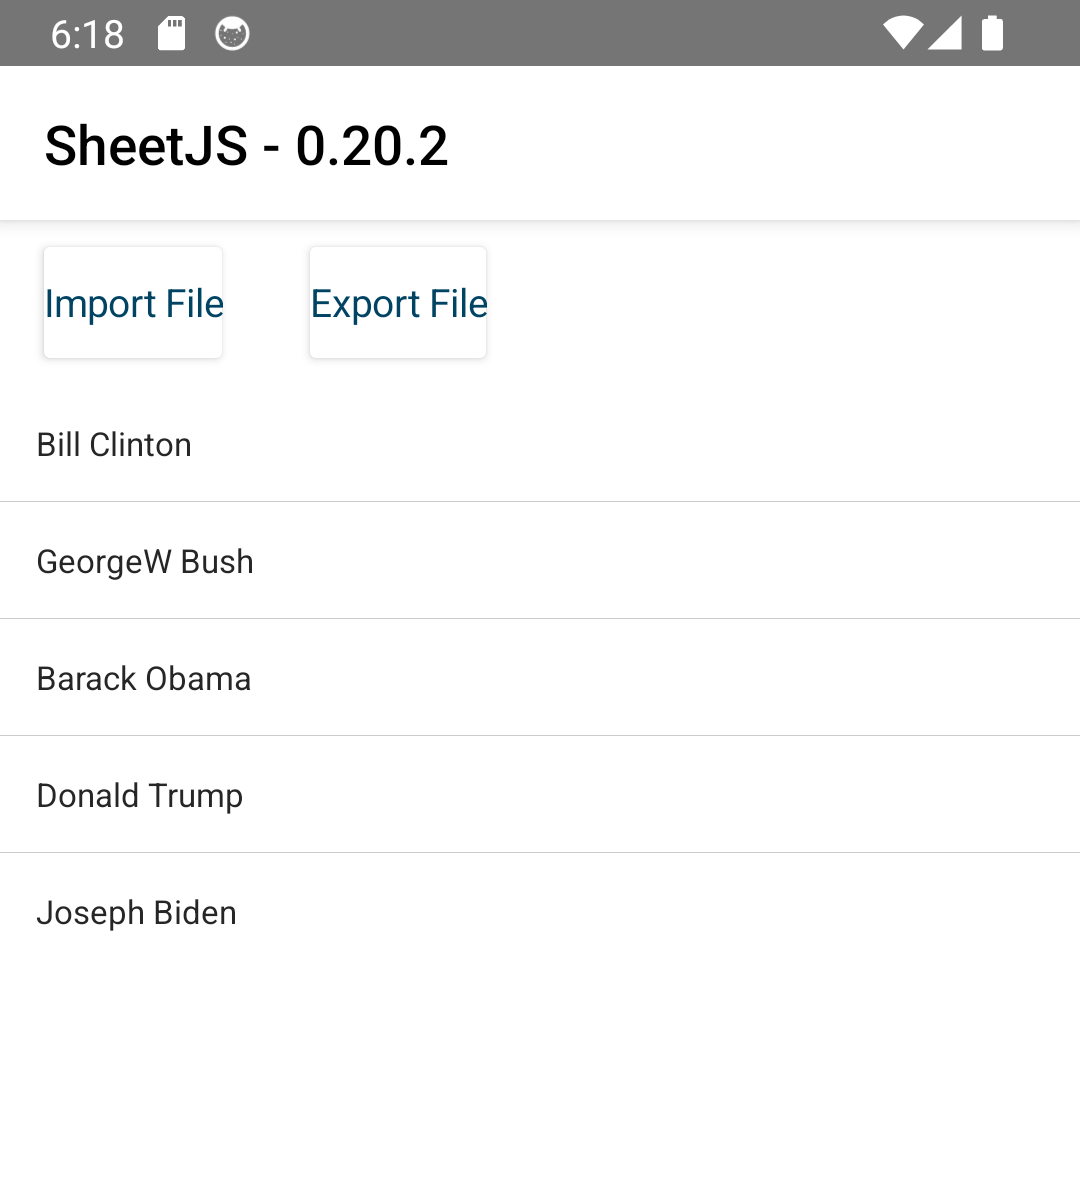
The "Complete Example" creates an app that looks like the screenshots below:
| iOS | Android |
|---|---|
|
|
The discussion covers the NativeScript + Angular integration. Familiarity with Angular and TypeScript is assumed.
This demo was tested in the following environments:
Real Devices
| OS | Device | NS | Date |
|---|---|---|---|
| Android 30 | NVIDIA Shield | 8.9.2 | 2025-05-06 |
| iOS 15.1 | iPad Pro | 8.9.2 | 2025-05-06 |
Simulators
| OS | Device | NS | Dev Platform | Date |
|---|---|---|---|---|
| Android 35 | Pixel 9 Pro XL | 8.9.2 | darwin-x64 | 2025-05-06 |
| iOS 18.4 | iPhone 16 Pro Max | 8.9.2 | darwin-x64 | 2025-05-06 |
| Android 35 | Pixel 9 | 8.9.2 | win11-x64 | 2025-06-08 |
| Android 36 | Pixel 9 | 8.9.2 | linux-x64 | 2025-07-06 |
Before starting this demo, manually disable telemetry.
NativeScript 8.6.1 split the telemetry into two parts: "usage" and "error". Both must be disabled separately:
npx -y -p nativescript ns usage-reporting disable
npx -y -p nativescript ns error-reporting disable
To verify telemetry was disabled:
npx -y -p nativescript ns usage-reporting status
npx -y -p nativescript ns error-reporting status
Integration Details
The SheetJS NodeJS Module can be imported from any component or script in the app.
The @nativescript/core/file-system package provides classes for file access.
The File class does not support binary data, but the file access singleton
from @nativescript/core does support reading and writing ArrayBuffer data.
Reading and writing data require a URL. The following snippet searches typical document folders for a specified filename:
import { Folder, knownFolders, path } from '@nativescript/core/file-system';

function get_url_for_filename(filename: string): string {
  const target: Folder = knownFolders.documents() || knownFolders.ios.sharedPublic();
  return path.normalize(target.path + "///" + filename);
}
App Configuration
Due to privacy concerns, apps must request file access. There are special APIs for accessing data and are subject to change in future platform versions.
Technical Details (click to show)
iOS
The following key/value pairs must be added to Info.plist:
<dict>
  <key>UIFileSharingEnabled</key>
  <true/>
  <key>LSSupportsOpeningDocumentsInPlace</key>
  <true/>
Android
Android security has evolved over the years. In newer Android versions, the following workarounds were required:
READ_EXTERNAL_STORAGEandWRITE_EXTERNAL_STORAGEallow apps to access files outside of the app scope. These are required for scoped storage access.
When the demo was last tested, this option was enabled by default.
android:requestLegacyExternalStorage="true"enabled legacy behavior in some older releases.
The manifest is saved to App_Resources/Android/src/main/AndroidManifest.xml:
  <application
    android:requestLegacyExternalStorage="true"
    android:name="com.tns.NativeScriptApplication"
    android:allowBackup="true"
    android:icon="@mipmap/ic_launcher"
    android:label="@string/app_name"
    android:theme="@style/AppTheme"
    android:hardwareAccelerated="true">
- Permissions must be explicitly requested.
@nativescript-community/perms is a community module for managing permissions:
import { request } from '@nativescript-community/perms';
import { File } from '@nativescript/core/file-system';
Storage access must be requested before writing data:
  /* request permissions */
  const res = await request('storage');
The external paths can be resolved using the low-level APIs:
  /* find Downloads folder */
  const dl_dir = android.os.Environment.DIRECTORY_DOWNLOADS;
  const dl = android.os.Environment.getExternalStoragePublicDirectory(dl_dir).getAbsolutePath();
  /* write to file */
  File.fromPath(dl + "/SheetJSNS.xls").writeSync(data);
Reading Local Files
getFileAccess().readBufferAsync can read data into an ArrayBuffer object.
The SheetJS read method1 can parse this data into a workbook object.2
import { getFileAccess } from '@nativescript/core';
import { read } from 'xlsx';

/* find appropriate path */
const url = get_url_for_filename("SheetJSNS.xls");

/* get data */
const ab: ArrayBuffer = await getFileAccess().readBufferAsync(url);

/* read workbook */
const wb = read(ab);
After parsing into a workbook, the sheet_to_json3 method can generate row
data objects:
import { utils } from 'xlsx';

/* grab first sheet */
const wsname: string = wb.SheetNames[0];
const ws = wb.Sheets[wsname];

/* generate array of row objects */
const data = utils.sheet_to_json(ws);
Writing Local Files
The SheetJS write method4 with the option type: "binary" will generate
Uint8Array objects. getFileAccess().writeBufferAsync can write data from a
Uint8Array object to the device.
iOS supports Uint8Array directly but Android requires a true array of numbers:
import { getFileAccess } from '@nativescript/core';
import { write } from 'xlsx';

/* find appropriate path */
const url = get_url_for_filename("SheetJSNS.xls");

/* generate Uint8Array */
const u8: Uint8Array = write(wb, { bookType: 'xls', type: 'binary' });

/* attempt to save Uint8Array to file */
await getFileAccess().writeBufferAsync(url, global.isAndroid ? (Array.from(u8) as any) : u8);
A worksheet can be generated from an array of row objects with the SheetJS
json_to_sheet method5. After generating an array, the book_new and
book_append_sheet methods6 can create the workbook.
Fetching Remote Files
getFile from @nativescript/core/http can download files. After storing the
file in a temporary folder, getFileAccess().readBufferAsync can read the data
and the SheetJS read method7 can parse the file:
import { knownFolders, path, getFileAccess } from '@nativescript/core'
import { getFile } from '@nativescript/core/http';
import { read } from 'xlsx';

/* generate temporary path for the new file */
const temp: string = path.join(knownFolders.temp().path, "pres.xlsx");

/* download file */
const file = await getFile("https://docs.sheetjs.com/pres.xlsx", temp)

/* get data */
const ab: ArrayBuffer = await getFileAccess().readBufferAsync(file.path);

/* read workbook */
const wb = read(ab);
Complete Example
Platform Configuration
- Disable telemetry:
npx -y -p nativescript ns usage-reporting disable
npx -y -p nativescript ns error-reporting disable
- Follow the official Environment Setup instructions8.
In previous test runs, NativeScript did not support the latest Android API.
The error message from npx -y -p nativescript ns doctor android clearly stated
supported versions:
✖ No compatible version of the Android SDK Build-tools are installed on your system. You can install any version in the following range: '>=23 <=33'.
If NativeScript does not properly support the latest API level, an older API version should be installed using Android Studio.
In a previous test run, the following packages were required:
Android 13.0 ("Tiramisu")API Level33Android SDK Build-ToolsVersion33.0.2
It is recommended to install the SDK Platform and corresponding Android SDK Build-Tools for the latest supported API level.
- Test the local system configuration for Android development:
npx -y -p nativescript ns doctor android
In the last macOS test, the following output was displayed:
Expected output (click to hide)
✔ Getting environment information
No issues were detected. ✔ Your ANDROID_HOME environment variable is set and points to correct directory. ✔ Your adb from the Android SDK is correctly installed. ✔ The Android SDK is installed. ✔ A compatible Android SDK for compilation is found. ✔ Javac is installed and is configured properly. ✔ The Java Development Kit (JDK) is installed and is configured properly. ✔ Getting NativeScript components versions information... ✔ Component nativescript has 8.9.2 version and is up to date.
- Test the local system configuration for iOS development (macOS only):
npx -y -p nativescript ns doctor ios
In the last macOS test, the following output was displayed:
Expected output (click to hide)
✔ Getting environment information
No issues were detected. ✔ Xcode is installed and is configured properly. ✔ xcodeproj is installed and is configured properly. ✔ CocoaPods are installed. ✔ CocoaPods update is not required. ✔ CocoaPods are configured properly. ✔ Your current CocoaPods version is newer than 1.0.0. ✔ Python installed and configured correctly. ✔ Xcode version 16.3.0 satisfies minimum required version 10. ✔ Getting NativeScript components versions information... ✔ Component nativescript has 8.9.2 version and is up to date.
Base Project
- Create a skeleton NativeScript + Angular app:
npx -y -p nativescript ns create SheetJSNS --ng
- Launch the app in the Android simulator to verify the app:
cd SheetJSNS
npx -y -p nativescript ns run android
(this may take a while)
Once the simulator launches and the test app is displayed, end the script by
selecting the terminal and pressing CTRL+C. On Windows, if
prompted to Terminate batch job, type Y and press Enter.
If the emulator is not running, nativescript may fail with the message:
Emulator start failed with: No emulator image available for device identifier 'undefined'.
In the most recent test, the build failed with an exception:
WARNING: A restricted method in java.lang.System has been called
WARNING: java.lang.System::load has been called by net.rubygrapefruit.platform.internal.NativeLibraryLoader in an unnamed module (file:/Users/sheetjs/.gradle/wrapper/dists/gradle-8.7-bin/bhs2wmbdwecv87pi65oeuq5iu/gradle-8.7/lib/native-platform-0.22-milestone-25.jar)
WARNING: Use --enable-native-access=ALL-UNNAMED to avoid a warning for callers in this module
WARNING: Restricted methods will be blocked in a future release unless native access is enabled
The NativeScript Gradle version is incompatible with Java 24!
It is strongly recommended to roll back to Java 21.
Add SheetJS
The goal of this section is to display the SheetJS library version number.
- From the project folder, install the SheetJS NodeJS module:
npm i --save https://cdn.sheetjs.com/xlsx-0.20.3/xlsx-0.20.3.tgz
- Edit
src/app/item/items.component.tsso that the component imports the SheetJS version string and adds it to aversionvariable in the component:
import { version } from 'xlsx';
import { Component, NO_ERRORS_SCHEMA, inject } from '@angular/core'

// ...

export class ItemsComponent {
  version = `SheetJS - ${version}`;
  itemService = inject(ItemService)
  page = inject(Page)
// ...
- Edit the template
src/app/item/items.component.htmlto referenceversionin the title of the action bar:
<ActionBar [title]="version"></ActionBar>

<GridLayout>
<!-- ... -->
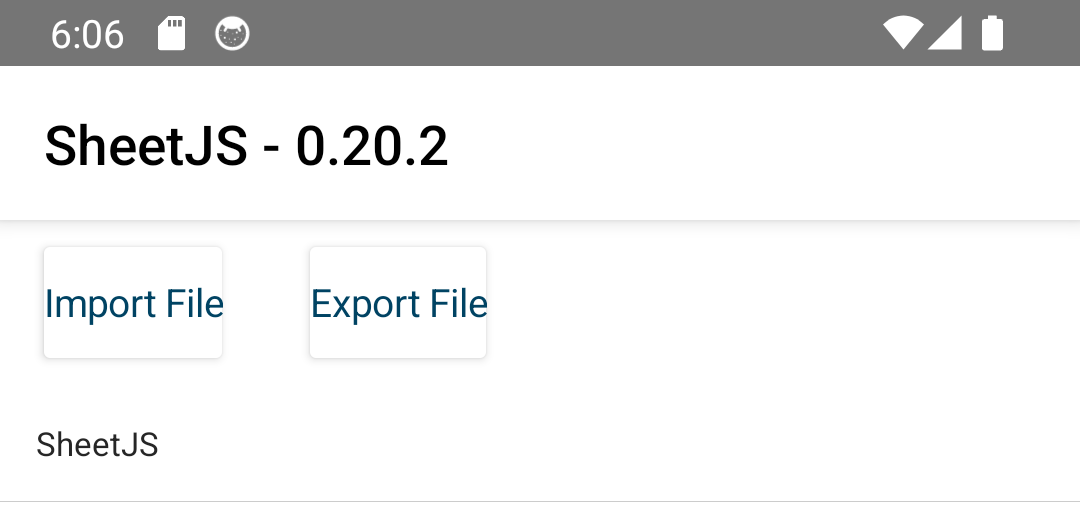
- End the script and relaunch the app in the Android simulator:
npx -y -p nativescript ns run android
The title bar should show the version.

Local Files
- Add the Import and Export buttons to the template:
<ActionBar [title]="version"></ActionBar>

<StackLayout>
  <StackLayout orientation="horizontal">
    <Button text="Import File" (tap)="import()" style="padding: 10px"></Button>
    <Button text="Export File" (tap)="export()" style="padding: 10px"></Button>
  </StackLayout>
  <ListView [items]="itemService.items()">
    <!-- ... -->
  </ListView>
</StackLayout>
- Add the
importandexportmethods in the component script:
import { version, utils, read, write } from 'xlsx';
import { Dialogs, getFileAccess } from '@nativescript/core';
import { Folder, knownFolders, path } from '@nativescript/core/file-system';
import { Component, NO_ERRORS_SCHEMA, inject } from '@angular/core'
import { NativeScriptCommonModule, NativeScriptRouterModule } from '@nativescript/angular'
import { Page } from '@nativescript/core'
import { ItemService } from './item.service'

function get_url_for_filename(filename: string): string {
  const target: Folder = knownFolders.documents() || knownFolders.ios.sharedPublic();
  return path.normalize(target.path + "///" + filename);
}

// ...

export class ItemsComponent {
  version = `SheetJS - ${version}`;
  itemService = inject(ItemService)
  page = inject(Page)

  /* Import button */
  async import() {
  }

  /* Export button */
  async export() {
  }

  // ...
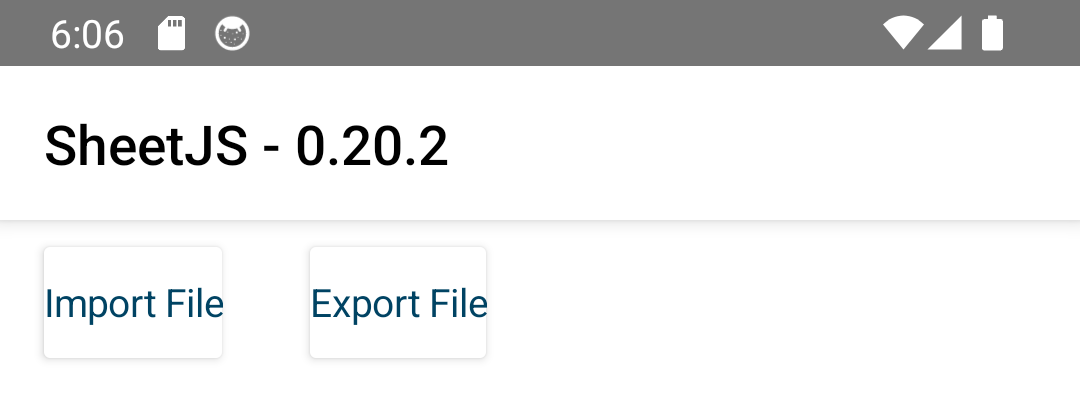
- End the script and relaunch the app in the Android simulator:
npx -y -p nativescript ns run android
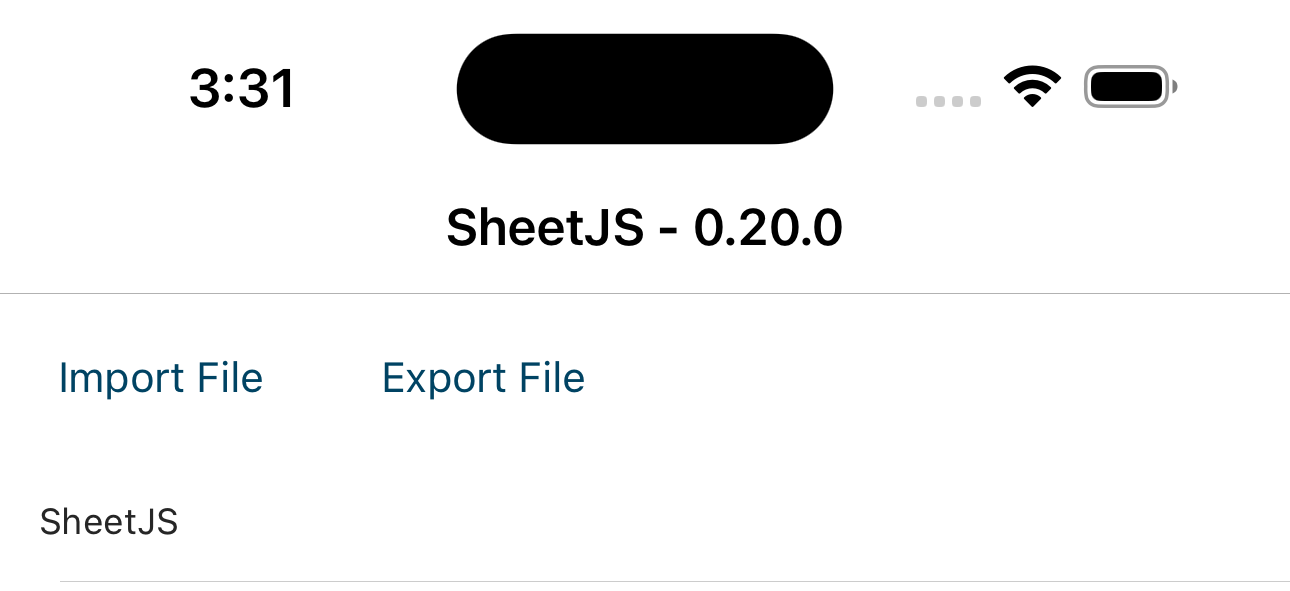
Two buttons should appear just below the header:
- Implement import and export by adding the highlighted lines:
  /* Import button */
  async import() {
    /* find appropriate path */
    const url = get_url_for_filename("SheetJSNS.xls");

    try {
      await Dialogs.alert(`Attempting to read from SheetJSNS.xls at ${url}`);
      /* get data */
      const ab: ArrayBuffer = await getFileAccess().readBufferAsync(url);

      /* read workbook */
      const wb = read(ab);

      /* grab first sheet */
      const wsname: string = wb.SheetNames[0];
      const ws = wb.Sheets[wsname];

      /* update table */
      this.itemService.items.set(utils.sheet_to_json(ws));
    } catch(e) { await Dialogs.alert(e.message); }
  }

  /* Export button */
  async export() {
    /* find appropriate path */
    const url = get_url_for_filename("SheetJSNS.xls");

    try {
      /* create worksheet from data */
      const ws = utils.json_to_sheet(this.itemService.items());

      /* create workbook from worksheet */
      const wb = utils.book_new();
      utils.book_append_sheet(wb, ws, "Sheet1");

      /* generate Uint8Array */
      const u8: Uint8Array = write(wb, { bookType: 'xls', type: 'buffer' });

      /* attempt to save Uint8Array to file */
      await getFileAccess().writeBufferAsync(url, global.isAndroid ? (Array.from(u8) as any) : u8);
      await Dialogs.alert(`Wrote to SheetJSNS.xls at ${url}`);
    } catch(e) { await Dialogs.alert(e.message); }
  }
Android
- Launch the app in the Android Simulator:
npx -y -p nativescript ns run android
If the app does not automatically launch, manually open the SheetJSNS app.
-
Tap "Export File". A dialog will print where the file was written. Typically the URL is
/data/user/0/org.nativescript.SheetJSNS/files/SheetJSNS.xls -
Pull the file from the simulator. The following commands should be run in a new terminal or PowerShell window:
adb root
adb pull /data/user/0/org.nativescript.SheetJSNS/files/SheetJSNS.xls SheetJSNS.xls
If the emulator cannot be rooted, the following workaround should be used:
adb shell "run-as org.nativescript.SheetJSNS cat /data/user/0/org.nativescript.SheetJSNS/files/SheetJSNS.xls" > SheetJSNS.xls
In the most recent win11-x64 test, the generated file was corrupt. This is a
known issue with Windows redirects. The solution is to generate a Base64-encoded
string and decode using PowerShell:
adb shell "run-as org.nativescript.SheetJSNS base64 /data/user/0/org.nativescript.SheetJSNS/files/SheetJSNS.xls" > SheetJSNS.xls.b64
$b64 = Get-Content -Path .\SheetJSNS.xls.b64 -Raw
$bytes = [Convert]::FromBase64String($b64)
[System.IO.File]::WriteAllBytes("SheetJSNS.xls", $bytes)
- Open
SheetJSNS.xlswith a spreadsheet editor.
After the header row, insert a row and make the following assignments:
- Set cell
A2to0 - Set cell
B2toSheetJS(type'SheetJSin the formula bar) - Set cell
C2toLibrary(type'Libraryin the formula bar)
After making the changes, the worksheet should look like the following:
id | name       | role
 0 | SheetJS    | Library
...
- Push the file back to the simulator:
adb push SheetJSNS.xls /data/user/0/org.nativescript.SheetJSNS/files/SheetJSNS.xls
If the emulator cannot be rooted, raw byte operations work in macOS and Linux:
dd if=SheetJSNS.xls | adb shell "run-as org.nativescript.SheetJSNS dd of=/data/user/0/org.nativescript.SheetJSNS/files/SheetJSNS.xls"
In the most recent win11-x64 test, neither workaround worked. The solution is
to generate a Base64-encoded string and decode in adb. After closing Excel and
saving the SheetJSNS.xls file, run the following commands:
$bytes = [IO.File]::ReadAllBytes(".\SheetJSNS.xls")
$b64 = [Convert]::ToBase64String($bytes)
echo $b64 | adb shell "run-as org.nativescript.SheetJSNS base64 -d | run-as org.nativescript.SheetJSNS dd of=/data/user/0/org.nativescript.SheetJSNS/files/SheetJSNS.xls"
- Tap "Import File". A dialog will print the path of the file that was read. The first item in the list will change.
iOS
iOS testing can only be performed on Apple hardware running macOS!
Xcode and iOS simulators are not available on Windows or Linux.
Scroll down to "Fetching Files" for Android device testing.
- Launch the app in the iOS Simulator:
npx -y -p nativescript ns run ios
-
Tap "Export File". A dialog will print where the file was written.
-
Open the file with a spreadsheet editor.
After the header row, insert a row and make the following assignments:
- Set cell
A2to0 - Set cell
B2toSheetJS(type'SheetJSin the formula bar) - Set cell
C2toLibrary(type'Libraryin the formula bar)
After making the changes, the worksheet should look like the following:
id | name       | role
 0 | SheetJS    | Library
...
-
Restart the app after saving the file.
-
Tap "Import File". A dialog will print the path of the file that was read. The first item in the list will change:
Fetching Files
- Replace
item.service.tswith the following:
import { read, utils  } from 'xlsx';
import { Injectable, signal, effect } from '@angular/core'
import { knownFolders, path, getFileAccess } from '@nativescript/core';
import { getFile } from '@nativescript/core/http';
import { Item } from './item'

interface IPresident { Name: string; Index: number };

@Injectable({ providedIn: 'root' })
export class ItemService {
  items = signal<Item[]>([]);
  constructor() { effect(() => { (async() => {
    /* fetch https://docs.sheetjs.com/pres.xlsx */
    const temp: string = path.join(knownFolders.temp().path, "pres.xlsx");
    const ab = await getFile("https://docs.sheetjs.com/pres.xlsx", temp)
    /* read the temporary file */
    const wb = read(await getFileAccess().readBufferAsync(ab.path));
    /* translate the first worksheet to the required Item type */
    const data = utils.sheet_to_json<IPresident>(wb.Sheets[wb.SheetNames[0]]);
    /* update state */
    this.items.set(data.map((pres, id) => ({id, name: pres.Name, role: ""+pres.Index} as Item)));
  })(); }); }

  getItem(id: number): Item {
    return this.items().find((item) => item.id === id)
  }
}
- End the script and relaunch the app in the Android simulator:
npx -y -p nativescript ns run android
The app should show Presidential data.
Android Device
- Connect an Android device using a USB cable.
If the device asks to allow USB debugging, tap "Allow".
-
Close any Android / iOS emulators.
-
Enable "Legacy External Storage" in the Android app. The manifest is stored at
App_Resources/Android/src/main/AndroidManifest.xml:
  <application
    android:requestLegacyExternalStorage="true"
    android:name="com.tns.NativeScriptApplication"
    android:allowBackup="true"
    android:icon="@mipmap/ic_launcher"
    android:label="@string/app_name"
    android:theme="@style/AppTheme"
    android:hardwareAccelerated="true">
- Install the
@nativescript-community/permsdependency:
npm i --save @nativescript-community/perms
- Add the highlighted lines to
items.component.ts:
- Import
Filefrom NativeScript core andrequestfrom the new dependency:
import { Dialogs, getFileAccess, Utils } from '@nativescript/core';
import { request } from '@nativescript-community/perms';
import { Folder, knownFolders, path, File } from '@nativescript/core/file-system';
import { Component, OnInit } from '@angular/core'
// ...
- Add a new write operation to the
exportmethod:
      /* attempt to save Uint8Array to file */
      await getFileAccess().writeBufferAsync(url, global.isAndroid ? (Array.from(u8) as any) : u8);
      await Dialogs.alert(`Wrote to SheetJSNS.xls at ${url}`);

      if(global.isAndroid) {
        /* request permissions */
        const res = await request('storage');
        /* write to Downloads folder */
        const dl = android.os.Environment.getExternalStoragePublicDirectory(android.os.Environment.DIRECTORY_DOWNLOADS).getAbsolutePath();
        File.fromPath(dl + "/SheetJSNS.xls").writeSync(Array.from(u8));
      }
    } catch(e) { await Dialogs.alert(e.message); }
- Build APK and run on device:
npx -y -p nativescript ns run android
If the Android emulators are closed and an Android device is connected, the last command will build an APK and install on the device.
Android Device Testing (click to hide)
When the app launches, if the SheetJS library is loaded and if the device is connected to the Internet, a list of Presidents should be displayed.
Tap "Export File". The app will show an alert. Tap "OK".
Switch to the "Files" app and open the "Downloads" folder. There should be a new
file named SheetJSNS.xls.
iOS Device
-
Connect an iOS device using a USB cable
-
Close any Android / iOS emulators.
-
Enable developer code signing certificates:
Open platforms/ios/SheetJSNS.xcodeproj/project.xcworkspace in Xcode. Select
the "Project Navigator" and select SheetJSNS. In the main view, select the
SheetJSNS target. Click "Signing & Capabilities". Under "Signing", select a
team in the dropdown menu.
When this demo was last tested, Xcode repeatedly crashed.
The issue was resolved by cleaning the project:
npx -y -p nativescript ns platform clean ios
- Add the following key/value pairs to
Info.plist:
<dict>
  <key>UIFileSharingEnabled</key>
  <true/>
  <key>LSSupportsOpeningDocumentsInPlace</key>
  <true/>
- Run on device:
npx -y -p nativescript ns run ios
If this is the first time testing an app on a device, the certificate must be trusted on the device:
Under "Settings" > "General" > "VPN & Device Management", there should be a "Apple Development" certificate in the "DEVELOPER APP" section. Select the certificate and confirm that "SheetJSNS" is listed under "APPS". Tap "Trust ..." and tap "Trust" in the popup.
iOS Device Testing (click to hide)
When the app launches, if the SheetJS library is loaded and if the device is connected to the Internet, a list of Presidents should be displayed.
Tap "Export File". The app will show an alert. Tap "OK".
Switch to the "Files" app and repeatedly tap "<". In the "Browse" window, tap
"On My iPhone". There should be a new folder named "SheetJSNS". Tap the folder
and look for the file named SheetJSNS.xls.
Footnotes
-
See "Workbook Object" ↩
-
See "Workbook Helpers" in "Utilities" for details on
book_newandbook_append_sheet. ↩ -
See "Local setup" in the NativeScript documentation. For Windows and Linux, follow the "Android" instructions. For macOS, follow both the iOS and Android instructions. ↩